Advance Notice

No new orders are currently being scheduled.

28 October 2011

Pumpkin Carving Tips

Halloween is almost here!  Planning to carve a pumpkin this year?  If so, here's a few tips that might make your project go a little smoother and last a little longer.  (There are lots of ways to carve a pumpkin and lots of tips on how to do so, these are just some that have worked for me in the past!)

While I haven't carved a pumpkin yet for this year (I'm planning to though, already have a pattern selected, just need a pumpkin!), here are K and I's creations from last year.  Kinda a little bit of proof that I somewhat know what I'm talking about. Hehe!  My creation is the headless disco dancer and K's is the take on an immensely popular arcade game.

2010       2010 - K

Now that you're inspired to create your own carving, here's those tips:
  1. Pick out a pumpkin that will make a good jack-o-lantern.  Traditionally, the larger the pumpkin, the easier it will be to carve.  Also, keep in mind what type of pattern, design, or stencil you will be carving and choose a pumpkin whose shape will fit the design.  Try to find pumpkins with smooth surfaces and large, sturdy stems.
  2. Once you've found the perfect pumpkin, you have to get inside to clean it out.  Most people opt to cut the top out of the pumpkin, creating a lid.  If so, carve at a 45° angle, this will provide the lid a "ledge" to sit on, rather than falling into the pumpkin as it dries down.  If your design lends itself to removal of the bottom of the pumpkin, slice it off flat and discard the base.  Easy peasy!
  3. Use sturdy scrapers to remove the "guts" and seeds.  I personally like to use metal cooking spoons, spatulas, or even an ice cream scoop.  Try to scrape the walls down to approximately 1 inch thick, this will make carving much easier.  And remember to keep the seeds!  They taste great roasted; here's how.
  4. Once your pumpkin is free of its insides, time to transfer the pattern!  My preferred method is to tape the pattern to the pumpkin, then use a small awl or drill to poke holes through the pattern and into the pumpkin.  Remove the pattern, then dust the surface of the pumpkin lightly with cornstarch or flour.  This will highlight the holes and make the pattern easier to see.  Keep the pattern for reference as you are cutting.
  5. I would recommend getting a set of pumpkin carving tools.  I personally am drooling over this one, but I take my pumpkin carving fairly seriously.  And since I don't own that set yet and it is still out of my budget, I use the inexpensive sets you can get at most major retailers.  Just make sure it has a scraper, drill, and a couple of different sized saws.
  6. Time to start carving!  Carve the smaller details first, then move on to the larger ones.  Be sure to carve slowly and take your time.  Getting in a hurry or try to force a piece of the carving out before it is fully cut could result in your design being altered from its original intent.
  7. Carve a ventilation hole in the back of the pumpkin (unless you are carving a reflective pattern).  Do not forget this step!  You will either catch your pumpkin on fire or your candle will not stay lit.
  8. Once you are finished carving, rub a thin layer of petroleum jelly over all the cuts.  This will help the pumpkin retain water and prevent it from drying out so quickly.
  9. Find the perfect place to display your work of art, add a candle, and light.  Don't forget to take photographs!  You can also sprinkle the inside of the pumpkin with some cinnamon, cloves, or nutmeg...it'll make a wonderful air freshener!
A little more inspiration for you...the pumpkin I carved in 2009.  I try to find patterns that are fairly unique, I don't think I've ever carved a "traditional" jack-o-lantern...I may have to do that one of these years.  But for now, "we're all mad here."  (That's what the side of the pumpkin said...rather hard to read in the photo.)

2009  2009

If you need a pattern for your pumpkin(s), there are numerous free ones available online.  Just do a search for "free pumpkin patterns" or, if you prefer, you can usually pick up a book of patterns in your local variety store.  If you purchase a book, I'd suggest making a copy of the pattern so that the book stays intact for future use.

Happy carving!  And I'd love to see your creations if you want to send them my way.  I'll share mine once I get it completed!

27 October 2011

Spider Cupcake Tutorial

A quick, little tutorial for friendly spider cupcakes.  Here's my version:

PA220178_cew

And here's what you'll need:
  • Cupcakes
  • Frosting
  • Food dye (your choice of color(s))
  • Star piping tip
  • Piping bag
  • Necco wafers or giant smarties
  • Licorice whips or licorice string
  • Fondant, if desired
  • Toothpicks, if necessary
  • Food color pens (only if you already have them!)

How to assemble:

1.  Dye your frosting the desired shade.  (If you are making black spiders, I would suggest starting with chocolate icing, then adding black food dye.  You won't have to use near as much coloring!)
2.  Place the star piping tip into your piping bag.  Fill with the colored frosting and begin piping stars randomly all over the cupcake.  Pull the piping bag straight up to give the spider a "spiky" texture or keep the  tip close to the surface of the cupcake to make the spider look flatter and slightly fluffy.  Alternatively, for a different look, you can also pipe random strings, still using the star tip, all over the cupcake.  (This is the method I used on the spider in the picture.)
3.  Cut licorice to the desired length for the legs of the spider.  Push them into the icing, then place additional small dabs of icing on top of the licorice to help hold it into place.  If you find the legs will not stay affixed, you can use toothpicks to hold them.  Just be sure that you tell everyone who will be eating the spiders that they need to be careful of the toothpicks!
4.  Place two Necco wafers or giant smarties at the front of the cupcake.  Using either a food color pen or a toothpick and your food dye, place a small dot on each wafer for the spider's eyes.
5.  Add any additional fondant or buttercream details.  Some ideas might be bows (as in the picture), fangs, or even hats...you're only limited by your imagination!

Happy baking!


26 October 2011

On Target

Or at least the cakes are this week.  Not so sure about a few other things!  But you're not here about those "other things," you're here for the cakes!

Handgun...check.  Ammo...check.  Pistol target...check.  Completely edible...check!

PA220164_cew

This cake was a bit of a headache for me.  Turns out that while you can find food grade molds for revolvers, semi-automatic handguns are a different story.  I actually ended up having to make my own mold!  Let's just say it was an adventure, and as always seems to be the case, if I go down this road again, there will definitely be some changes made to the execution.  But, regardless, I was extremely happy with how the cake looked.  And, yes, the handgun and bullets are completely edible...they are even hand painted!

PA220186_cew

My apologies for the darkness of this photo...seemed I couldn't get a good picture from any angle!  The only  request the client had for this cake was that a photo of the birthday girl be used.  Since she's a singer, I opted to include a few bars of "Happy Birthday to You" as well.  And if you look closely, you can see where I added her name to the song in a different font.

PA220176_cew

My first official cupcake cake!  I must admit, I do not like cupcake cakes in the traditional sense of the term.   I've never understood why someone would want several cupcakes all iced together...doesn't that just lend itself to messiness?? Anyway, my solution was to ice the cupcakes individually, then put them together to form the "cake."  It may not be traditional, but I like it.  Hehe.  Oh, and that lonely white cupcake to the left?  It was for the candle.  And don't forget the spider in the upper right.  I'm working on a tutorial so you can make your own, hopefully it will be posted by the end of the week, just in time for Halloween!

Speaking of, have you bought your Halloween candy yet?

25 October 2011

Perfectly Popped Popcorn


Why would you want to pop your own popcorn?  Well, it's cheaper, and you can control the flavor...those seem like two perfectly good reasons to me!  So next time you make popcorn, try this method.  You'll have very, very few un-popped kernels, nothing burns, and either a healthy snack or the perfect ingredient for that caramel corn recipe you've been hanging on to!

You'll need:
  • 3 Tbsp canola or peanut oil (really any type of oil, as long as it has a high smoke point, but do not use vegetable oil!)
  • 1/3 cup popcorn kernels
  • 3 to 4 quart covered saucepan
  • Melted butter (if desired)
  • Salt or other seasonings (if desired)
How to do it:
  • Heat the oil in the saucepan on medium high heat.
  • Put 3 or 4 popcorn kernels into the oil and cover.  Have the rest of your popcorn kernels ready!
  • When the kernels in the pan pop, add the rest of 1/3 cup of kernels in an even layer.  Cover the pan, remove from the heat and count to 30.
  • Return the pan to the heat.  The popcorn should begin popping all at once.  Once it really starts popping, shake the pan back and forth, gently, over the burner.  For drier, crisper popcorn, try to keep the lid slightly ajar to allow the steam to escape, just be mindful of the steam and possible hot oil drops!
  • Once the pops are several seconds apart, remove from heat and pour immediately into a large bowl.  Add melted butter, salt, or other seasonings to taste, then toss to coat.
This recipe yields about 2 quarts of popcorn (approximately 8 cups) or 2 servings.

A few additional tips/suggestions:
  • If you know you want salted popcorn, you can add the salt to the hot oil.  Then as the popcorn pops, the salt will distribute among the kernels.
  • Some toppings to try:  Garlic salt, cayenne pepper, smoked paprika, grated Parmesan cheese, etc.
Find the printable of this recipe here.

Mmm...tasty!


23 October 2011

Hiatus

Big news to share with you today…

After much soul searching and many sleepless nights, I’ve decided to take a hiatus from decorating cakes, effective November 1.

Let me be clear though that I am not completely walking away from the kitchen.

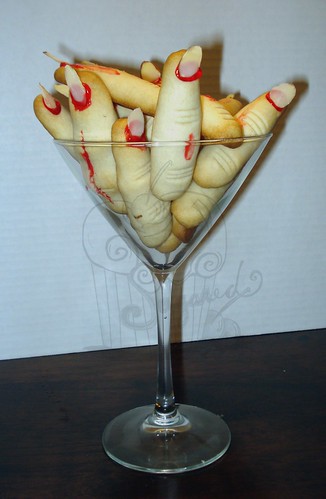
After all, I still enjoy working with food…particularly food of the sugary sweet persuasion.  It’s just that I need to ration my intake; find some balance in my life again.  And once I determine what a good level of intake is (i.e. one that allows me time to live my life and still bake and cake and cook), I’ll ratchet up to that level again.  But for now I can’t sustain the heavy workload I’ve brought on myself… I suppose that’s what too much of a good thing too quickly does to you.

And as reassurance that I am not throwing in the towel for good:

~ The blog will still be here, hopefully as a better source of information (recipes, tips, etc.) rather than just a cake “fashion plate.” 

~ All the cake orders that I have standing, regardless of date scheduled, will still be fulfilled and completed to the same exacting standard I demand of myself (and that you have hopefully come to expect).

~ And, yes, even after the standing orders are done, there will still be a few cakes in the mix…after all, I’m not superwoman, I can’t give up something I love cold turkey!

So…to all of you who have supported me thus far…THANK YOU.  Without your support, feedback, and more continued support, most of the projects I've completed over the past couple of years would have been impossible.  And if you do need a cake, go ahead and check with me; if my time, schedule, and energy permit, I’ll be more than happy to create one for you!

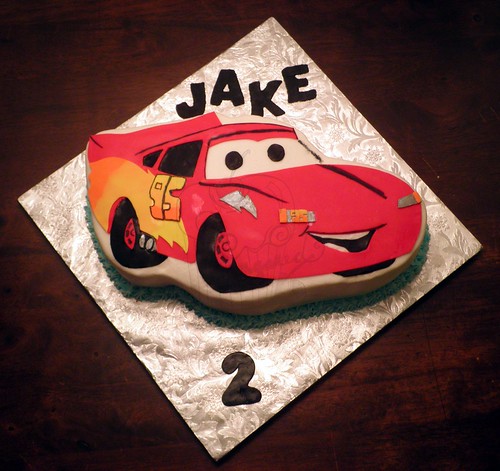
Just FYI…this is not a decision I’ve reached lightly.  I started decorating cakes because it was a fun, creative outlet for me.  I never dreamed that it would take off for me the way it has…and I’m thankful that it has, absolutely no regrets. (Well maybe a couple, but I trust God will work things out for the best!)  Unfortunately though, I can’t sustain the 40 hour workweek at my regular job, as well as the 40 hour workweek at my “hobby.”  The sad truth of the matter is that rather than continuing to bring me joy, cake decorating has become a duty for me…one that has currently cost me far too much in terms of relationships, personal well-being, and happiness.

By taking this break (is it still a break if I dabble slightly?), I hope to find some peace and happiness again.  I’m looking forward to spending more quality time with the people I love and to doing things that I enjoy.   I can’t wait to have time to work in the yard or to curl up on the deck in the evenings with a good book.  To plan (and actually attend) weekend happenings or to lounge around on a lazy Saturday if that’s how the mood strikes me.  To take a vacation without a year of pre-planning or to begin conquering my bucket list, which seems to be getting longer every day.  The list of things I want to get back to is long, and varied, but so full of life…my life.

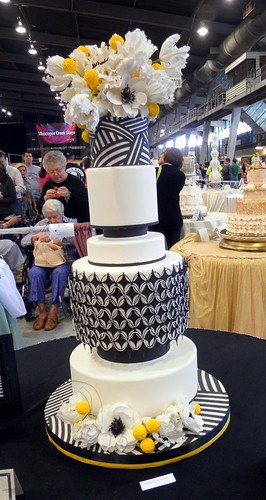
I can’t wait to find that harmonious balance again.  Hopefully, the new mix will include plenty of sugar, both literally and figuratively.   And I promise, you haven’t seen the last of my cake and confection creations!

I'll be back!*

20 October 2011

Book of Memories

PA150136_cew

I made this scrapbook cake for an 80th birthday celebration.  The cake was covered in fondant, and the photos, which were provided by the family, were printed on icing sheets so that they too were edible!  Ironically though, no one actually wanted to cut and eat the photos when it came time, so we ended up removing them from the cake prior to cutting.  (The cake didn't look quite so pretty afterward, but it still tasted good!)

I received several comments on how realistic the book looked, and judging by the fingerprints that appeared in the fondant after its display at the reception, I'd venture there were more than a few people who tried to turn the pages.  But that's one of the best compliments a cake artist can receive!

PA150116_cew

The scrapbook cake served as a centerpiece, accompanied by these two sheet cakes.  They look fairly small here, but were actually both 16" square cakes...about 80 servings each.  That's a lot of cake!  Luckily, K and family all like cake, so they didn't mind leftovers. (I did mention the party was for K's grandfather, right?  Well, if not, now you know.  Hehe!)  It was a fabulous celebration and I was blessed to be invited to attend and help them them celebrate.

As for other cakes this week, there was also this rendition of a very popular race car:

PA060005_cew

The cake itself was iced in buttercream, then the car was cut from fondant and layered onto the cake.  It had a slightly raised/3D look when it was finished due to some of the layering involved with each color of fondant.

And, I once again entered the realm of sculpting.  Oh, and I even did some painting...freehand!

PA150106_cew

This cake was designed to match the party invitations and the birthday girl had specifically requested a leopard.  And since the client requested buttercream, I opted to hand paint the animal prints onto the cake with diluted food colors.  I wish the patterns had been a bit more vibrant, but they still turned out well!

PA150111_ew

The leopard turned out a tad more orange than I would have liked...perhaps he's a new cross between a tiger and a leopard.  What would that breed be?  A leoger?  Or maybe a tipard?  The world may never know...

Talk to you soon!

18 October 2011

Pink Pork Perfectly Palatable


Good news for pork eaters:  the USDA has lowered the recommended safe-cooking temperature for whole cuts of pork from 160°F to 145°F + 3 minutes of rest time.

This means that those pork chops we all love can now safely be served on the pink side.  (I admit I've been doing this for years, but now it is government approved!!)  

It may still be pink, but it is safe to eat!

Mmm...tasty!


11 October 2011

No Streaking!


Want streak free windows and mirrors?  Or really any type of glass for that matter?  Clean them with newspaper!  Yep, just plain ol' newspaper and your favorite glass gleaning solution.  They'll leave behind a streak free, lint free shine the very first time.  And, when you are finished, just toss the used newsprint in the recycling bin, no extra laundry to do.

Mmm...tasty!


10 October 2011

Wedding Cakes Rock - OSSAS 2011

Whew!  I've finally managed to wade through all the photos I took at the Oklahoma Sugar Art Show on October 1 & 2.  I literally had hundreds to sift through, and rather than post them all, I chose a few of my favorite entries to share with you.

Disclaimer:  None of the cakes pictured here (besides the one at the very end of the post) are my work.  They are all the work and creation of very talented sugar artists.  I was unable to get the artist's name for all of these photos, but if I've pictured your cake here, and you'd like me to list your name as the creator, let me know, and I'll be happy to!


It's all about the eye candy today!

The theme for the Grand National Wedding Cake Competition this year was "Wedding Cakes Rock," meaning that the artists didn't have to use any particular theme for inspiration, but could instead use their wildest imagination to create dream wedding cakes.  They are in no particular order (other than the first photo, after that its just how I snapped the photos as we viewed the entries).  Hope you enjoy!

PA021513_cew
Winner of the Grand National Wedding
Cake Competition

PA021600_cew


PA021597_cew


PA021521_cew


PA021501_cew


PA021499_cew


PA021500_cew


PA021520_cew


PA021587_cew


PA021588_cew


PA021592_cew


PA021601_cew


PA021603_cew

The Grand National Wedding Cake Competition runs in conjunction with the Oklahoma Sugar Art Show.  The entries below were entered in the OSSAS.  Also, keep in mind that everything showcased here has to be able to be re-created in cake or some edible medium (i.e. sugar, gumpaste, chocolate, etc.).  While Styrofoam cake dummies are acceptable for use, if the cake is carved into shape (see Smurfette cake below, as well as several of the other photos) then the entry must be cake!

PA021555_cew


PA021528_cew


PA021572_cew


PA021570_cew


PA021569_cew


PA021549_cew


PA021571_cew


PA021527_cew


PA021563_cew


PA021558_cew

Pretty amazing stuff, huh?  I aspire to master some of these beautiful techniques...though I'm a far cry from competing with any of these masters!

As for my entry that won second place in its division, did any of you guess this one?

PA051632_cew

Hope you enjoyed seeing all the beautiful cake artistry today!  Talk to you soon!
Oh...and what would a trip to the fair be without trying some kind of crazy "fair food" item?  This year's winner for craziest dish tried goes to K, for the fried peanut butter and jelly sandwich.

PA021611_cew

I tried a bit of it and have to say it wasn't half bad...I wouldn't want to eat one very often, but it was better than I anticipated.  And a shout out to some of the rest of the fam (SP, MP, and KP) and friends (MZ and CZ) that came to enjoy the crowds with K and I, it was great to see all of you!