Advance Notice

No new orders are currently being scheduled.

31 January 2012

Should I Wash...Canned Beans?


Yes!  You should wash canned beans - they are better for you when you do!  Rinsing canned beans (just place them in a strainer and run under cold water) will remove almost 40% of the sodium content.  If you're worried about the lack of liquid impacting your finished dish, don't be; the liquid you're washing away is just thick, starchy, super salty water, so you'll be better off adding additional liquid and seasoning to suit your taste as you progress with the recipe. 

Mmm...tasty!


27 January 2012

Nacho Cheesecake

After making this cheesecake, I understand a little bit better why food stylists must love their jobs.  When I arrived with this dish, most everyone thought it was some kind of salad, not dessert for the evening!

You can substitute your own favorite cheesecake recipe, though to achieve the right look, you'll want to use one that can be baked in a pie plate, rather than in a springform pan.  And if you can't find the candies suggested, use your imagination and substitute something different.  For instance, I couldn't find black licorice dots to make "sliced olives," so I chopped up black licorice strings to make "chopped olives."

Nacho Cheesecake
Printable Recipe
Adapted from Food Network Magazine
Yield: 1-9 inch cheesecake (approx 10 servings)
P1200382_cew

Ingredients:
  • For the Cheesecake:
    • 1 1/2 cups graham cracker crumbs
    • 1/4 cup sugar
    • 6 Tbsp butter, melted
    • 16 oz cream cheese, at room temperature
    • 2/3 cup sugar
    • 1 tsp grated lemon zest
    • 2 Tbsp fresh lemon juice
    • 1 tsp vanilla extract
    • 3 large eggs
    • Orange food coloring (or yellow and red food coloring)
    • Cooking spray
    • 1/2 cup sour cream
    • 1/4 cup sugar
  • For the Chips:
    • 2 rolls refrigerated pie dough
    • Flour, for dusting
    • 1 Tbsp milk
    • 4 to 6 Tbsp sugar
  • For the Salsa & Garnishes:
    • 8 red Swedish Fish
    • 1/4 cup strawberry jam
    • 3 green licorice twists
    • 6 black licorice dots
    • 3 Tbsp chocolate covered raisins
    • 3 Tbsp sour cream
    • Orange food coloring (or yellow and red food coloring)

Preparation:
  1. Make the cheesecake:  
    1. Preheat oven to 350°F.  Mix the graham cracker crumbs, 1/4 cup sugar, and melted butter until well combined.  Spray a 9-inch pie plate with cooking spray, then press the graham cracker mixture onto the bottom of the pan.  Chill the crust for 15 to 20 minutes.
    2. Beat the cream cheese with a mixer until smooth.  Add the 2/3 cup sugar, the lemon zest, lemon juice, and vanilla; beat well.  Beat in the eggs one at a time.  Tint the batter orange with the food coloring.  Pour the batter into the pan and bake until puffed and almost set, 20 to 30 minutes.
    3. Mix the sour cream and 1/4 cup sugar; spread over the hot cheesecake and bake 5 more minutes.
    4. Let cool completely on a wire rack, then chill 2 hours.
  2. Make the chips:
    1. Allow pie dough to soften as directed on box.  Unroll 1 of the pie dough rolls on a lightly floured surface, flatten slightly.  Brush the dough with half the milk and sprinkle with half the sugar.  Cut the dough into 2" wide strips.
    2. Cut each strip of dough into as many 2" wide triangles as possible.   Place the triangles on a parchment lined baking sheet.
    3. Repeat steps 1 and 2 with the remaining roll of pie dough.
    4. Bake at 450°F until lightly golden, 8 to 10 minutes.  Transfer to a wire rack and cool completely.
  3. Make the salsa & garnishes:
    1. Cut the Swedish Fish into 1/2-inch pieces and toss with the strawberry jam.
    2. Cut the green licorice on the diagonal into 1/8-inch thick slices for green "chiles."
    3. For the "olives," cut the black licorice dots into 1/4-inch thick rounds.  Use a straw or pastry tip to remove a circle from the center of each round.
    4. Tint the sour cream orange with the food coloring to look like melted cheese.  Spoon the orange sour cream into a pastry bag.
  4. Decorate:
    1. Press the pie crust "chips" into the cheesecake.
    2. Add the black licorice "olives," the chocolate covered raisins, the green "chiles," and the Swedish Fish "salsa."
    3. Snip a small corner from the bag of orange sour cream and pipe a few dots on the cheesecake for "melted cheese."
    4. Refrigerate until ready to serve.  (Don't decorate the cheesecake too far in advance of serving. The pie crust "chips" will soften in the refrigerator.)
Happy baking!


25 January 2012

Toasted Marshmallow Fudge Cake

Sounds good doesn't it?

This was the cake I made for my Dad's birthday last weekend, and it couldn't be simpler to whip up!  The recipe calls for a boxed mix, but feel free to use your favorite dark chocolate scratch cake in it's place.  Also, the size of the jar of fudge is negotiable - this is not a strict recipe, so what ever size you are able to find at your local grocery will work, though the larger the jar the gooey-er the cake will be!  (The jar I used was 16 oz and it was plenty, I don't know that I'd go much over that...)  And, while I opted to place the cake on an oven-safe platter after baking it, but before melting the marshmallows over the top, don't hesitate to leave it in the sheet pan.  One less dish to wash that way and you won't lose any of the yummy toasted marshmallow on the plate!

Here's a view of the inside of the cake (the family had enjoyed a large portion of it by the time I snapped this pic...please excuse the crumbs.)

P1210416_cew

Don't worry:  It may not look like much, but served warm or cold, the ooey-gooey goodness can't be ignored!

Toasted Marshmallow Fudge Cake
Printable Recipe
Adapted from Confessions of a Cookbook Queen
Yield:  9x13 sheet cake
P1210395_cew

Ingredients:
  • 1 box Dark Chocolate Fudge cake mix (I used Duncan Hines)
  • Eggs called for on the box
  • Oil called for on the box
  • Water called for on the box
  • 1 jar hot fudge ice cream topping (make sure it's "Hot Fudge" and not "Chocolate Syrup")
  • 14 oz marshmallow creme

Preparation:
  1. Preheat the oven to the temperature called for in the cake recipe.  Grease and flour a 9x13 baking pan and set aside.
  2. Prepare the cake batter as instructed on the box or in your recipe.  Bake according to the recipe instructions.
  3. When the cake is almost done, heat the hot fudge topping until it is pourable.  
  4. Upon removing the cake from the oven, immediately increase the oven heat to 400°F.  If you are going to place the cake on an OVEN-SAFE platter, let the cake cool slightly, then turn out onto the serving dish.  
  5. Poke holes across the surface of the cake, using the end of a wooden spoon or a similar object, about an inch apart.  (You want the holes to be fairly large in order to soak up the fudge, so don't use anything tiny.)  Pour the hot fudge slowly over the entire surface of the cake, tilting the pan or platter slightly to allow all the holes to soak up the sauce.
  6. Evenly spoon all of the marshmallow creme over the surface of the cake.  (Helpful Tasty Tip here.)  Let stand for 5 minutes or until it has begun to melt.  Carefully spread the marshmallow creme over the entire cake with an offset spatula.  Place the cake in the pre-heated 400°F oven, and remove once the marshmallow topping is browned.
Happy baking!


24 January 2012

A Sticky Subject


Dread having to scoop sticky ingredients (i.e. honey, molasses, marshmallow creme, etc) out of a jar?  Or having to measure them?  Here's a couple of tips to help ease the pain:
  • If you will use the entire jar or container, rub some shortening or oil onto the spoon/knife/spatula you'll be using to scoop the ingredient.  It will keep the substance from sticking as quickly to the utensil, making it easier to empty the container.  (Only use this method if you're using the entire package, the shortening/oil will contaminate any leftovers!)  You can use this tip to help remove the ingredient from measuring cups as well.
  • If your recipe calls for a grease based ingredient (shortening, oil, butter), measure it first, then use the same cup without washing it to measure the sticky one.
  • Line a measuring cup with a piece of plastic wrap, making sure it overhangs the cup by a couple of inches.  This will allow you to measure the ingredient without making a mess of the measuring cup - simply pick the plastic wrap up by the corners and add the ingredient to the mixing bowl.
Mmm...tasty!


23 January 2012

Magnolias & A Monkey Mimeo

There are cookies in the oven, so I only have a few minutes, but I couldn't continue putting off sharing some of the latest sugary goodness from my kitchen.  So, let's go!

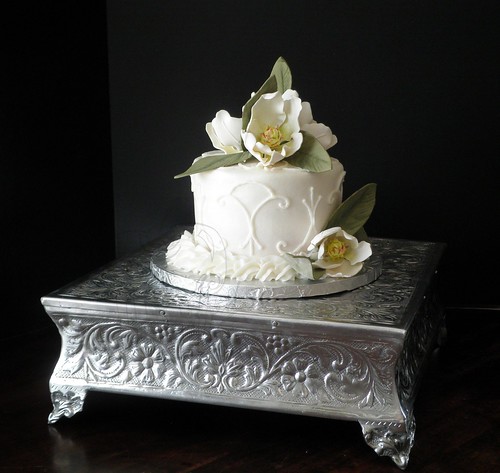
When I received the call about this wedding cake I was still basking in the completion of the holiday season.  (Truthfully, I was in a bit of a vegetative state...nothing like a wedding cake order to snap you out of that!)  I couldn't turn the order down though and welcomed the challenge - luckily, I had a few magnolias already on-hand and the cake didn't have to be very large.

P1080291_cew

It was classic white cake with vanilla buttercream.  The piping was done in buttercream by hand and the magnolias were made from gumpaste.

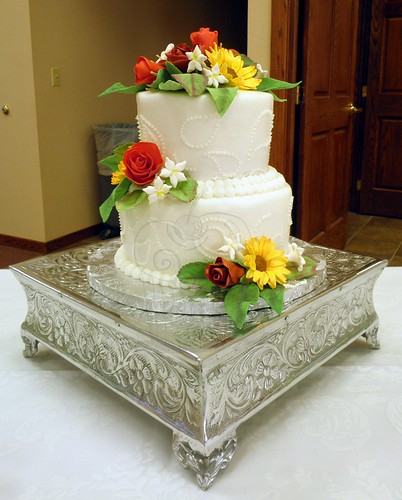
These two cakes were for the same birthday, and I had free reign for the designs.  I wanted to create something in a black and white palette with just a pop of color.

P1140354_cew

Both cakes were covered in buttercream with fondant accents and ribbon roses.  The buttercream on the black cake started out brown (it was chocolate, yum!), but I needed it to be black...so rather than dye the icing, I opted to airbrush the cake.  Doing so prevented the icing from tasting bitter because of all the black food dye that would have been required to get it nice and dark, and it gave me a reason to get out my airbrush! Hehe!

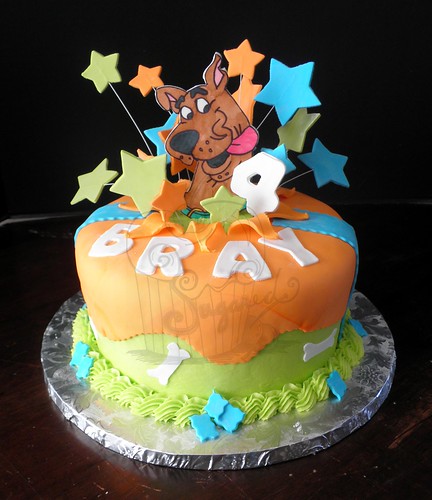
Some of you may remember this cake I made awhile back;  I was asked to create a similar cake with just a few changes in the design.  I found doing so to be almost as difficult as creating a design from scratch; after all, I had to try to remember all the techniques, colors, and designs I used in the original!  Luckily, I keep a few notes on each cake I make, so I had something other than photos to jog my memory.

P1140315_cew

I was, admittedly, worried about achieving the right color of pink to add to the cake; I wasn't sure how well it would tie in with the orange, but the end result was a nice one.  The monkey was a bigger version of the original - I had a horrible time getting the gumpaste to not "slump" while drying, hence, the reason she appears to be leaning back slightly.  Next time, I'll add a bit more tylose, and hopefully, the problem won't reappear!

P1160369_ew

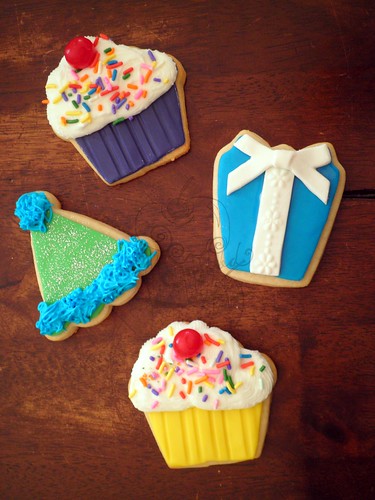
My cookie decorating skills are improving!  (And my cookie cutter collection continues to grow, I'm going to have find a new way to store them all and soon.  *sigh*  A bigger kitchen?  Maybe in my dreams...)  I know I said I didn't want to see another sugar cookie for weeks after Christmas, but these were quite fun to make...I particularly like the cupcakes!

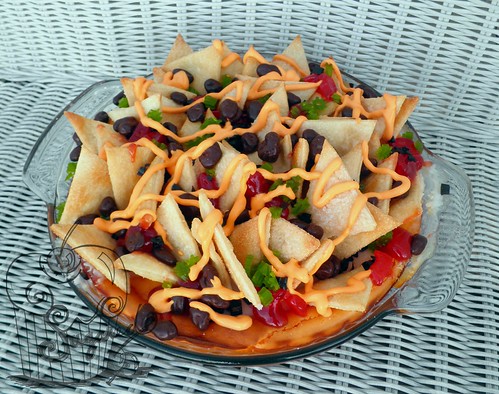
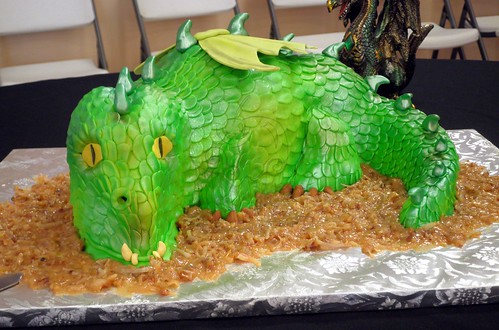
And, last, but not least...the nacho cheesecake!

P1200382_cew

Yes...it is a cheesecake, and all the toppings are sweet, sugar-laden goodness!  This is one of those projects I didn't intend to have on my calendar, but I couldn't resist making it.  (And with my slimmer cake schedule, I actually had time to!)  I even made dinner for the whole family just so I could make dessert - they didn't seem to mind though.  This would make a fun game day food, so I'll share the how-to with you, so you can make your own.  Be sure to keep an eye out for it later this week!

Adios!

17 January 2012

No Chilling Needed


Does your cut-out cookie recipe call for the dough to chill for several hours before rolling?  Next time, roll out the fresh dough between two sheets of wax paper, then cut-out your cookies.  Place them on your parchment lined baking sheets, and chill for at least 15 minutes, then bake!  No waiting for several hours to finish your cookies, and no adding additional flour to the dough when you roll it out.

Mmm...tasty!

10 January 2012

Crispy, Oven-Baked Fries


Love crispy french fries, but hate all the grease that comes with them?  Tired of the less than crispy version, though less greasy, ones you get when you bake them in the oven?  If so, it's time to get out your pizza stone!

Pizza stones are built to distribute high heat evenly and to extract moisture from food - the secret to a crispy pizza crust...or crispy, oven-baked fries!

How-to:
Preheat the stone in the oven for at least 15 minutes; scatter the frozen (or fresh) potatoes on top and bake according to the package or recipe directions.  Flip them halfway through the cooking time to brown both sides.

Mmm....tasty!

04 January 2012

A Dragon Tale

And the final cakes of 2011!

I haven't had a chance yet between the holidays and the Fiesta Bowl (Go Pokes!  Fiesta Bowl Champions!) to take a final tally of the number of sugar creations I turned out this past year, but I can tell you that the number far exceeded that of 2010!

The last week of 2011, I finally got to make a cake that was themed around one of my favorite cartoon characters.  It's somewhat hard to believe that with all the cakes I've done thus far, he hasn't popped up somewhere prior to this...

PC270194_cew

The cake was iced in buttercream with the orange fondant overlay on the top to create the "explosion."  The stars and character were edible - made from gumpaste, of course.

I also was pleased to get to create a wedding cake and cupcakes for a New Year's Eve Eve wedding (December 30, for those of you trying to figure out what I mean there).  The wedding cake was all buttercream with a stippled paisley pattern and gumpaste roses and sunflowers for the topper.

PC300217_cew

To accompany the cake, there were also several dozen cupcakes in red velvet, carrot cake, and white almond.  Each flavor was topped differently to both complement the main cake and wedding colors, as well as to simplify serving.  The white almond cupcakes were topped with a blue and white swirl of buttercream with silver dragee accents, the carrot cake cupcakes with miniature gumpaste sunflowers and leaves, and the red velvet cupcakes with miniature gumpaste roses and leaves.

PC300220_cew

PC300218_cew

PC300222_cew

Here's a look at the bride's table once the cupcakes and cake were set-up:

PC300231_ew

I also created the groom's cake for the wedding.  Yes, it was a dragon...a 3D dragon.  Confession time:  I would rather make hundreds of cupcakes or a huge wedding cake that needs tons of handmade flowers and piping than a 3D cake.  3D cakes stress me out to unbelievable proportions; often reducing me to tears, so I'm sure you understand why I limit my exposure to them.  But, that being said, I do (and will) dabble in them occasionally.  I thought this one turned out quite well...here he is in all of his green glory:

PC300209_cew

Yes...those are scales are all individual pieces of fondant.  They took over 3 hours to cut and apply!  But, I wasn't willing to compromise the overall look of the cake just to save myself a few hours of work, which is why I went the individual scale route versus one piece of fondant embossed to give a scaly appearance.  The wings and spikes were made from gumpaste...meaning everything was edible.  (Do you get tired of me telling you that?  I hope not because having as much of the finished cake being made from edible product as possible is a point I pride myself on.)  The dragon is surrounded by coconut pecan frosting "dirt."  The reason?  The groom's favorite cake was German chocolate, but that style of cake tends to be too light to hold up to carving...so we opted to use a dense chocolate cake to build the dragon, with coconut pecan frosting as the filling and accent.  Oh, and I used my trusty airbrush to give the dragon some dimension; he started out completely lime green in color!

I hope you're looking forward to everything 2012 has in store.  I know I am!  Talk to you soon!
P.S. For those of you wondering how the Fiesta Bowl trip went, it was fabulous!  A perfect way to start out a new year.  A huge thanks to SP, MP, and KP for allowing me to tag along and to Madre for helping make it possible...it's an experience I won't soon forget.


03 January 2012

Soggy Shoes


Today's tip isn't necessarily "tasty" in the normal sense of the word, but if you've set a New Year's resolution to start a fitness regimen, it'll still come in handy.  In fact, I'd venture, it'll be helpful to anyone who wears shoes.

Next time you get caught in the rain/snow in your favorite pair of shoes, stuff them with newspaper when you get home.  The newsprint will help the shoes retain their shape and will also draw out the moisture.  If the shoes are particularly wet, you will want to change the paper out several times to get the most benefit.

Mmm...tasty!