Advance Notice

No new orders are currently being scheduled.

30 July 2013

Chip vs Bar


Your recipe calls for semisweet chocolate (i.e. the bar kind), but all you have on hand is semisweet chocolate chips; can you use the chips instead?

Possibly, though it depends on your recipe.  If you're making brownies, cookies, or other simple batters or doughs, the chocolate chips should work just fine.  If you're making molded candies or using the chocolate for dipping or coating, stick with the bar chocolate.

The reason?  Chocolate chips are designed to keep their shape when heated, so they don't melt as smoothly or temper as easily.  And, chocolate chips tend to be too thick for dipping or coating.

Mmm...tasty!


23 July 2013

Ingredient Substitution: Unsweetened Chocolate


Ever needed a few ounces of unsweetened chocolate for a recipe, but find you don't have any on hand and don't want to go to the store?  Or maybe you're trying to make a dairy free dessert, but can't find any unsweetened chocolate that isn't processed on equipment that also processes milk?  If so, try making your own.  It's simpler than it sounds, promise.

Just use this formula:
3 tablespoons cocoa + 1 tablespoon fat = 1 ounce of unsweetened chocolate

For the fat, you can use vegetable oil, shortening (melted), or butter (melted, preferably unsalted).  Simply stir the cocoa and fat together and use as you normally would.

Mmm...tasty!


16 July 2013

How To: Blind Bake a Pie Crust


First things first - what is "blind baking" a pie crust?  Blind baking a pie crust simply means that you are baking an unfilled pie shell to produce a partially or completely baked crust prior to filling it.  You often employ this method for custard, pudding, or fruit pies.

One of the biggest problems you'll encounter when blind baking a crust is that it will shrink, leaving an unattractive and often too small shell to hold the filling.  Follow this method to help prevent the shrinkage and garner a beautifully baked crust:
  • All the standard rules for handling pie crust apply - cold ingredients, coarse crumbs, letting the dough rest, not over handling - you know the rules, right?  You can use this method with nearly any pie crust recipe, so just use your favorite.
  1. After your dough has rested, roll out your dough and place it in the pie tin.  If you have excess dough hanging over the edges, trim it slightly, but leave enough (about 3/4") that you can roll the edges of the dough under.  This creates a thicker dough around the lip of the pie plate which is less likely to shrink and pull down the sides.  Crimp the edges as you normally would.
  2. Freeze the dough in its pie plate before baking.  This isn't absolutely necessary, but freezing the crust overnight or even for an hour makes the dough less likely to shrink.
  3. When ready to bake, preheat the oven to 425°F and place a baking sheet on the top rack.  (Yes, it's an empty baking sheet, you want it pre-heated.)
  4. Line the dough with a piece of parchment paper and fill with pie weights/uncooked beans/uncooked rice before baking.  If you have enough weights, pile most of them around the sides of the crust (this is commonly where the dough tries to shrink the most), but make sure you still have weights in the middle of the crust as well to prevent bubbling.
  5. Turn the oven down to 400°F, place the prepared crust on the pre-heated baking sheet and bake for 12-15 minutes (on average) or until the crust begins to lose its translucent, unbaked color and the edges begin to turn golden.  Cool on a wire rack, removing the pie weights once they are cool enough to be handled.
Mmm...tasty!


12 July 2013

Fresh Friday: Vol. 5


It's FRIDAY!  And, while Fridays are always good things, this Friday is capping off a busy, but thoroughly good week.  Three reasons why it's been a better than usual week:
  1. It rained!!  And I don't mean just a little spit in the bucket, I mean it rained cats and dogs, had 2 inches in the rain gauge, kind of rain.  It even prevented me from running outdoors Thursday evening; no complaints though.
  2. Nuts.com - no this is not an advertisement, but I am officially hooked on their plantain chips and carrot chips.  Not to mention their shipping is fast and the product packaging makes me smile.  You should check them out if you're looking for dried fruits/veggies/nuts/chocolate...they have lots of options.
  3. The t-shirts for the 5K my family is hosting in a couple of weeks finally arrived.  I've got to get the bibs and tee's ready to mail to our virtual runners this weekend.
How was your week?  Feel free to share in the comments or pop over and share with Katherine @ Real Food Runner.

Have a great weekend!


09 July 2013

It's the Pits


It's cherry season!  One of the bad things about cherries though is having to remove the pits prior to using them in most any recipe.  What to do if you don't have a cherry pitter?  Just grab a chopstick and a glass bottle with an opening smaller than your cherries (a glass soda bottle usually works very well).  Now that you've gathered your tools, what to do?

Simply place an upside down cherry over the opening of the bottle (stem will be inside the bottle), then take your chopstick and press it through the bottom of the cherry, forcing the pit out and into the bottle.  Voila, pitted cherries without a cherry pitter!

Mmm...tasty!


05 July 2013

Monkeys & Monsters

Did you have a fabulous 4th of July?  We had a pretty good time celebrating though we didn't see any amazing firework shows or even create much in the way of our own display; we usually take the latter option.  But, this year, with the drought still on, we didn't want to be "those" people.  You know, the ones that set the pasture on fire due to a stray spark from an aerial firework.  Although, having the fire department show-up does add a certain panache to your BBQ...

Anywho, I hope you had a fabulous holiday; that you ate way too much, celebrated successfully, and spent some time either with the people you love or doing something you enjoy.  Isn't that the best way to celebrate our great country?

And, now, on to the cakes.  (Horrible segue, I know...I haven't mainlined enough coffee yet this morning.)

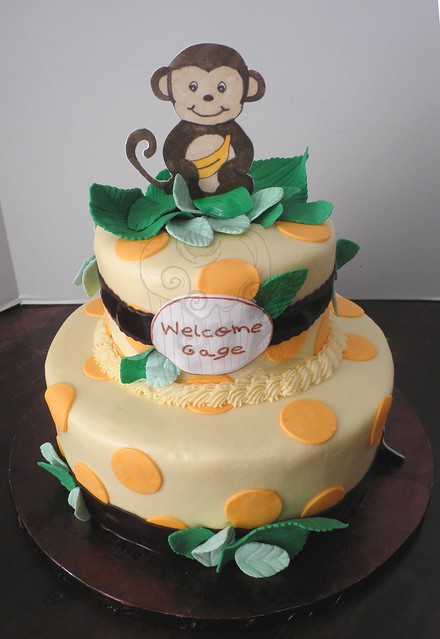
This cute monkey was pleased to get to help welcome a new baby.  It was a refreshing change to create a baby shower cake with no pink or blue in sight;  I know those are the "traditional" colors, but it's nice to do something a little different every once in a while.

P6280038_cew

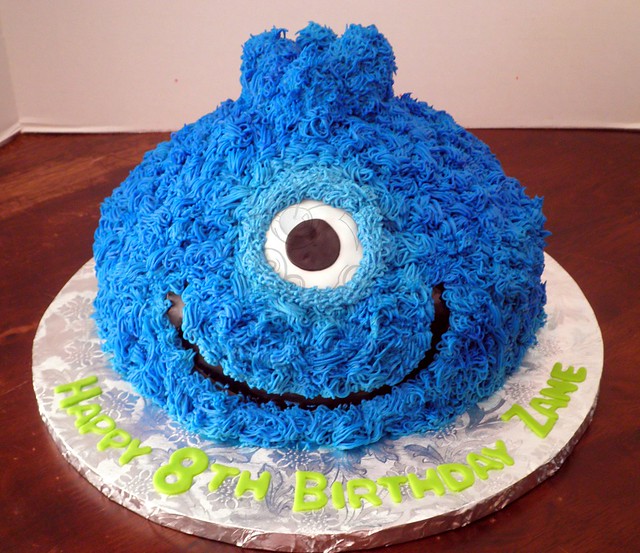
This monster cake was definitely blue though.  Not "blue" as in sad; trust me he was a happy, friendly monster complete with a spiky mohawk, but seriously blue in color.  I iced him in a light blue buttercream, piped on darker blue buttercream "hair" and then airbrushed him with an even darker blue to add some shading and contrast.

P6260018_cew

There were also some monster eye cupcakes to accompany the cake.  Though from the looks of things, this cupcake may be about to become the monster's lunch...
P6260015_ew

Talk to you soon!


02 July 2013

Custom Slices


Planning a cookout for the 4th of July, or any other day during the warm weather for that matter?  If you're serving burgers and plan on offering cheese as one of the toppings, consider visiting the deli counter at your local market.  You'll often have a wider selection of cheese varieties to choose from, you can buy only as much as you need, and you can specify the thickness.  Plus, ultra-thin, fresh sliced cheese will melt into a nice even layer.

The deli counter is also the perfect source for fresh sliced cold cuts next time you're making an antipasto platter or are just craving a good sub or sandwich.

Mmm...tasty!