Advance Notice

No new orders are currently being scheduled.
Showing posts with label How-To. Show all posts

21 February 2014

Tutorial: Candy Melt Inscription Transfers

One of the things I dislike most about cake decorating is writing on cakes.  I don't have "pretty" handwriting even on paper.  Is my handwriting distinctive?  You bet.  Is it "pretty?"  Not even close.  And, despite all my schooling, writing in cursive is pretty much not happening, ever.  I print.  Or type.

Aside from worrying about whether the writing is pretty or not, there's also the worry about correct spacing, making sure the words don't run downhill, not misspelling anything (I live in fear of doing this, I don't want to end up on CakeWrecks because of a misspelling)...needless to say, sometimes it takes me longer to get lettering/wording on cake than it does to decorate the rest of it.  It's an exhausting process.

But, one of my methods to help prevent mess-ups and to circumvent the whole "less than pretty" handwriting problem is to use candy melt inscription transfers.  Or in other words, to write on the cake using candy melts.  Although, technically, I don't write directly on the cake...anywho, here's how it works:

How-To:  Candy Melt Inscription Transfers

What You'll Need:
Sheet Pan (or some other smooth, flat surface that is portable,
will hold your design, and will conduct cold well)
Wax Paper
Scotch Tape
Template of the design
Candy melts/wafers in your desired color
Piping bag
Piping tip
Offset Spatula
Iced/decorated cake

CandyWriteTute1

What To Do:
1.  Tape the design template to the sheet pan.  I typically turn the sheet pan over so I don't have to worry about bumping into the edge of the pan while I'm piping the design.
2.  Cover the template with wax paper; be sure to tape the wax paper down so it doesn't move around.  Put the sheet pan (template, wax paper, and all) into the freezer while you melt the candy wafers according to the package directions until smooth.  Place the piping tip in the piping bag, then fill with the melted candy wafers.
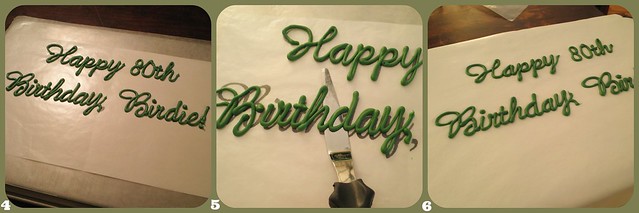
3.  Remove the sheet pan from the freezer.  Begin piping over your design template.
CandyWritingTute2

4.  Continue until you have piped the entire design.  Carefully place the sheet pan back into the freezer, freeze until the candy melts have hardened.  Once the transfer is completely set-up, you can remove it from the freezer and keep at room temperature until ready to use.
5.  When you are ready to transfer the design to your cake, place the sheet pan with the design still on it, back into the freezer.  Allow to harden, usually about 10 minutes or so.  Once the design is frozen, remove the sheet pan from the freezer and immediately, but gently, use an offset spatula to loosen the candy melt design from the wax paper.  Work quickly, but carefully; you want the pieces to still be semi-frozen when you place them on the cake.
6.  Once the pieces are loosened from the wax paper, place immediately onto the cake.  Finish decorating, as needed.
P2080013_cew
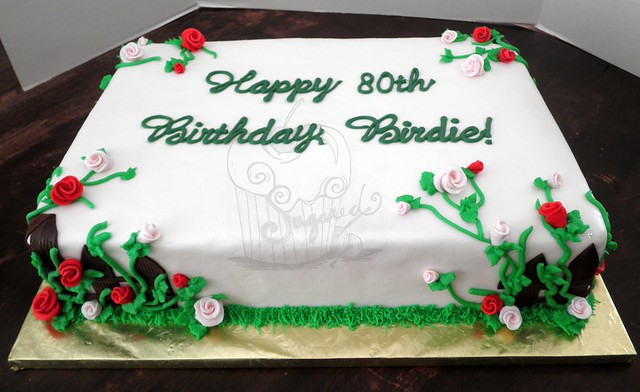
Finished cake with candy melt writing transfer.
See, easy peasy.  Nearly any type of writing can be mimicked using this method, and these types of candy melt decorations can be made days in advance or minutes before use.  They really are fairly quick to create once you have all the needed supplies.  You can also use this method to pipe fairly simple design elements (hearts, swirls, monograms, etc) to be used as decorations for cakes, mini cakes, and cupcakes.

You're probably thinking, "why all the freezer time?"  Well, I've discovered that initially freezing the sheet pan makes the candy melts set-up faster, meaning they will hold their shape better rather than flattening out and possibly running together.  Freezing again immediately after piping the design also means that the melts will set-up more quickly, again minimizing the chance of flattening/running.  The final freezer visit ensures that the melts are well set-up and cold enough that the heat from your hands won't cause the design to melt while you are applying it to the cake.

Happy caking!


P.S. You can click on the tutorial photos to see larger versions of them.


01 October 2013

Can I Freeze...Eggs?


You bet you can!  There are rules to doing so, though.  And, then there are also rules to using frozen eggs in place of fresh eggs.  Ah...so many rules!

Regarding freezing eggs:
  • Use only clean, fresh eggs.
  • Frozen eggs, if stored properly, can be kept for up to 1 year.
  • For whole eggs, beat until they are just blended, then pour into freezer containers that seal tightly, label with the number of eggs and the date and freeze.
  • For egg whites - make sure no yolks are in the whites, then pour the whites into freezer containers, seal tightly, label with the number of whites and the date, and freeze.
    • For easier measuring and thawing, try freezing each white in standard ice cube tray, then when frozen solid, transfer to a freezer container.
  • For yolks, you need to give them special treatment otherwise they will turn very thick and gel-like when frozen.  Once if you've added the necessary "extra" (see below), put the yolks into a freezer container, label with the date, number of yolks, and whether you added salt or sugar.  Freeze.
    • If you plan to use the yolks in "sweet" recipes, beat in 1 1/2 teaspoons sugar per 4 yolks.
    • If you plan to use the yolks in "savory" recipes, beat in 1/8 teaspoon salt per 4 yolks.
Regarding using frozen eggs:
  • Thaw the eggs overnight in the refrigerator or under cold running water.
  • Use whole eggs or egg yolks as soon as they are thawed.  Thawed egg whites will beat to better volume if allowed to sit at room temperature for about 30 minutes.
  • Do not re-freeze thawed eggs.
  • The American Egg Board recommends the following substitutions when using frozen eggs:
    • 2 tablespoons thawed egg white for 1 large fresh white
    • 1 tablespoon thawed egg yolk for 1 large fresh yolk
    • 3 tablespoons thawed whole egg for 1 large fresh egg
Mmm...tasty!

16 July 2013

How To: Blind Bake a Pie Crust


First things first - what is "blind baking" a pie crust?  Blind baking a pie crust simply means that you are baking an unfilled pie shell to produce a partially or completely baked crust prior to filling it.  You often employ this method for custard, pudding, or fruit pies.

One of the biggest problems you'll encounter when blind baking a crust is that it will shrink, leaving an unattractive and often too small shell to hold the filling.  Follow this method to help prevent the shrinkage and garner a beautifully baked crust:
  • All the standard rules for handling pie crust apply - cold ingredients, coarse crumbs, letting the dough rest, not over handling - you know the rules, right?  You can use this method with nearly any pie crust recipe, so just use your favorite.
  1. After your dough has rested, roll out your dough and place it in the pie tin.  If you have excess dough hanging over the edges, trim it slightly, but leave enough (about 3/4") that you can roll the edges of the dough under.  This creates a thicker dough around the lip of the pie plate which is less likely to shrink and pull down the sides.  Crimp the edges as you normally would.
  2. Freeze the dough in its pie plate before baking.  This isn't absolutely necessary, but freezing the crust overnight or even for an hour makes the dough less likely to shrink.
  3. When ready to bake, preheat the oven to 425°F and place a baking sheet on the top rack.  (Yes, it's an empty baking sheet, you want it pre-heated.)
  4. Line the dough with a piece of parchment paper and fill with pie weights/uncooked beans/uncooked rice before baking.  If you have enough weights, pile most of them around the sides of the crust (this is commonly where the dough tries to shrink the most), but make sure you still have weights in the middle of the crust as well to prevent bubbling.
  5. Turn the oven down to 400°F, place the prepared crust on the pre-heated baking sheet and bake for 12-15 minutes (on average) or until the crust begins to lose its translucent, unbaked color and the edges begin to turn golden.  Cool on a wire rack, removing the pie weights once they are cool enough to be handled.
Mmm...tasty!


26 October 2012

I Want To Suck Your Blood

Not literally, of course.  And, admit it, you read that title in an old school Count Dracula voice, didn't you?

There will be no literal blood sucking today, friends.  But...I am going to give you a recipe for making your very own sugar blood from corn syrup.  Yes, it is as fun as it sounds and it's perfect for your upcoming Halloween party!

A couple of caveats - Number 1:  it's sticky stuff.  Seriously sticky, so just stay aware of that as you are splattering it about and garnishing glasses and platters and such.  And Number 2:  it's a bit messy.  But, honestly, aren't most of the really good/fun things in life?

Here's just a tiny example of the fun you can have with this stuff!

PA230336_cew

Bet you're wondering where I came up with a glass that offers you a chance to name your poison, huh?  Turns out I have an entire set of them...everything from Arsenic to Carbolic Acid to Paris Green; found them at a thrift store.  Oh the things you can find in places like that!  And yes, that is a ceramic skull wearing a hat in the background.  He's actually a candle holder; been in the family for years and part of a matched set.  He and his buddy used to welcome visitors to the haunted houses the fam once hosted in days gone by...aw, the memories!

Anyway, moving on to the recipe for corn syrup blood...

Corn Syrup Blood
Yield:  Approx 1/4 cup

Ingredients:
  • 1/4 cup light corn syrup
  • 1 tsp molasses, preferably blackstrap
  • Red food coloring, approx 1/2 tsp
Preparation:
  1. Stir together the corn syrup and molasses in a small bowl.  Add the red food coloring until desired shade of red is reached.
  2. Have fun using the "blood" to decorate and garnish!  Store in an airtight container if not using immediately.
Gory goodness!

15 October 2012

Halloween Cupcake Trio

PA070181_ew

Halloween is just a couple of weeks away!  Have you gotten your costume yet?  I haven't; need to put that on my to-do list, I suppose.  Anywho...maybe you have your costume, but still need an idea for some fun themed sweets?  If so, you are in luck because that's exactly what I have for you today - a trio of easy to create Halloween cupcakes.

First things first, you'll need to bake some cupcakes.  Standard size, any flavor will do.  Got those?  Good.  Moving on to the first cupcake...

The "Forbidden Bite" as I've termed it.  Or the one next to the arrow in the photo below:

Forbidden Bite cupcake

Forbidden Bite Cupcakes

You will need:
  • Cupcakes
  • Frosting of your choice (I'd recommend either white or a light ivory color and a medium-ish consistency)
  • Red piping gel
  • Lollipop sticks (two to three will be sufficient)
How-to:
  1. Frost each cupcake as flat as possible; it doesn't have to be perfect.
  2. Using the lollipop stick, poke two holes, approximately an inch apart, in the frosting of each cupcake.  Again, you don't have to be perfect.  (You could also use a cookie stick, etc. to make the holes.)
  3. Apply a bit of red piping gel directly over each hole in the frosting, then use a lollipop stick to slightly force some of the gel into the holes, but be careful not to fill the hole in.  Apply another spot of red piping gel just below the holes, and use a lollipop stick to slightly drag the gel downward, creating a "bloody" drip.
  4. Viola!  Forbidden Bite (aka Vampire Bite) cupcakes.
Next up, pumpkin patch cupcakes (again, follow the arrow):

Pumpkin Patch Cupcake

Pumpkin Patch Cupcakes

You will need:
  • Cupcakes
  • Frosting of your choice, tinted green
  • Pumpkin candy corn candies (I used the Brach's Autumn Mix)
How-to:
  1. Using a grass piping tip, pipe the frosting onto the cupcakes.
  2. Apply 2 to 3 of the pumpkin candies to the top of each cupcake.
  3. Viola!  Pumpkin Patch cupcakes.
And, the last of the trio, lollipop ghost cupcakes (yep, there's an arrow for this one too!):

Ghost Cupcake

Lollipop Ghost Cupcakes

You will need:
  • Cupcakes
  • Frosting of your choice (any color, flavor, etc)
  • Small lollipops (I used DumDums brand)
  • White fondant
  • Black food pen OR black piping gel
How-to:
  1. Frost the cupcakes.  Any style of swirl, etc will be fine - it's completely left to your creative interpretation!
  2. Unwrap the lollipops and stick one in the center of each cupcake, making sure you press the stick in far enough to go into the cupcake and not just into the icing.
  3. Roll out the white fondant and cut out several 3 to 4 inch circles, only cutting a few at a time to prevent the fondant from drying out while you are working.  Apply a dab of water to the top of each lollipop.  Drape one fondant circle over each dampened lollipop.
  4. Using the black food pen or black piping gel, draw two eyes on the fondant to create a ghost.
  5. Viola!  Lollipop Ghost cupcakes.
Happy haunting!


14 February 2012

How-To: Chop Chocolate


Ah...Valentine's Day.  The holiday that's all about amore, roses, and chocolate.  And, while the first two things are fabulous and great, I'm concerned with the chocolate today...specifically how to chop chocolate.

Choose a serrated-blade knife (a bread knife works especially well), and begin at the corner of the chocolate with the knife angled slightly outward.  Then using a smooth back and forth sawing motion and pressing only as hard as necessary, begin to whittle the chocolate into almond sized pieces.  Once you have cut one corner down sufficiently, rotate the chocolate and begin on a new corner until all the chocolate is chopped into fairly uniform-sized pieces.

If you find that the chocolate seems too soft or starts to melt, place it in the refrigerator for about 15 minutes.  You can also do this prior to chopping to make the chocolate even easier to work with.

Mmm...tasty!


07 February 2012

How-To: Hull Strawberries


Planning on making a delicious strawberry dessert for your sweetheart on Valentine's Day?  If so, try this tip for hulling strawberries:

Center a sturdy, plastic straw at the bottom of the strawberry.  Push the straw up toward the cap of the strawberry, keeping the straw as centered as possible.  The core and cap will come off in one easy movement.

And, as an added bonus, this makes the strawberry easier to stuff or pipe full of additional deliciousness.  Maybe a yummy cheesecake filling with a sprinkling of graham cracker crumbs and then dipped in chocolate?

Mmm...tasty!


27 January 2012

Nacho Cheesecake

After making this cheesecake, I understand a little bit better why food stylists must love their jobs.  When I arrived with this dish, most everyone thought it was some kind of salad, not dessert for the evening!

You can substitute your own favorite cheesecake recipe, though to achieve the right look, you'll want to use one that can be baked in a pie plate, rather than in a springform pan.  And if you can't find the candies suggested, use your imagination and substitute something different.  For instance, I couldn't find black licorice dots to make "sliced olives," so I chopped up black licorice strings to make "chopped olives."

Nacho Cheesecake
Printable Recipe
Adapted from Food Network Magazine
Yield: 1-9 inch cheesecake (approx 10 servings)
P1200382_cew

Ingredients:
  • For the Cheesecake:
    • 1 1/2 cups graham cracker crumbs
    • 1/4 cup sugar
    • 6 Tbsp butter, melted
    • 16 oz cream cheese, at room temperature
    • 2/3 cup sugar
    • 1 tsp grated lemon zest
    • 2 Tbsp fresh lemon juice
    • 1 tsp vanilla extract
    • 3 large eggs
    • Orange food coloring (or yellow and red food coloring)
    • Cooking spray
    • 1/2 cup sour cream
    • 1/4 cup sugar
  • For the Chips:
    • 2 rolls refrigerated pie dough
    • Flour, for dusting
    • 1 Tbsp milk
    • 4 to 6 Tbsp sugar
  • For the Salsa & Garnishes:
    • 8 red Swedish Fish
    • 1/4 cup strawberry jam
    • 3 green licorice twists
    • 6 black licorice dots
    • 3 Tbsp chocolate covered raisins
    • 3 Tbsp sour cream
    • Orange food coloring (or yellow and red food coloring)

Preparation:
  1. Make the cheesecake:  
    1. Preheat oven to 350°F.  Mix the graham cracker crumbs, 1/4 cup sugar, and melted butter until well combined.  Spray a 9-inch pie plate with cooking spray, then press the graham cracker mixture onto the bottom of the pan.  Chill the crust for 15 to 20 minutes.
    2. Beat the cream cheese with a mixer until smooth.  Add the 2/3 cup sugar, the lemon zest, lemon juice, and vanilla; beat well.  Beat in the eggs one at a time.  Tint the batter orange with the food coloring.  Pour the batter into the pan and bake until puffed and almost set, 20 to 30 minutes.
    3. Mix the sour cream and 1/4 cup sugar; spread over the hot cheesecake and bake 5 more minutes.
    4. Let cool completely on a wire rack, then chill 2 hours.
  2. Make the chips:
    1. Allow pie dough to soften as directed on box.  Unroll 1 of the pie dough rolls on a lightly floured surface, flatten slightly.  Brush the dough with half the milk and sprinkle with half the sugar.  Cut the dough into 2" wide strips.
    2. Cut each strip of dough into as many 2" wide triangles as possible.   Place the triangles on a parchment lined baking sheet.
    3. Repeat steps 1 and 2 with the remaining roll of pie dough.
    4. Bake at 450°F until lightly golden, 8 to 10 minutes.  Transfer to a wire rack and cool completely.
  3. Make the salsa & garnishes:
    1. Cut the Swedish Fish into 1/2-inch pieces and toss with the strawberry jam.
    2. Cut the green licorice on the diagonal into 1/8-inch thick slices for green "chiles."
    3. For the "olives," cut the black licorice dots into 1/4-inch thick rounds.  Use a straw or pastry tip to remove a circle from the center of each round.
    4. Tint the sour cream orange with the food coloring to look like melted cheese.  Spoon the orange sour cream into a pastry bag.
  4. Decorate:
    1. Press the pie crust "chips" into the cheesecake.
    2. Add the black licorice "olives," the chocolate covered raisins, the green "chiles," and the Swedish Fish "salsa."
    3. Snip a small corner from the bag of orange sour cream and pipe a few dots on the cheesecake for "melted cheese."
    4. Refrigerate until ready to serve.  (Don't decorate the cheesecake too far in advance of serving. The pie crust "chips" will soften in the refrigerator.)
Happy baking!


10 January 2012

Crispy, Oven-Baked Fries


Love crispy french fries, but hate all the grease that comes with them?  Tired of the less than crispy version, though less greasy, ones you get when you bake them in the oven?  If so, it's time to get out your pizza stone!

Pizza stones are built to distribute high heat evenly and to extract moisture from food - the secret to a crispy pizza crust...or crispy, oven-baked fries!

How-to:
Preheat the stone in the oven for at least 15 minutes; scatter the frozen (or fresh) potatoes on top and bake according to the package or recipe directions.  Flip them halfway through the cooking time to brown both sides.

Mmm....tasty!

27 October 2011

Spider Cupcake Tutorial

A quick, little tutorial for friendly spider cupcakes.  Here's my version:

PA220178_cew

And here's what you'll need:
  • Cupcakes
  • Frosting
  • Food dye (your choice of color(s))
  • Star piping tip
  • Piping bag
  • Necco wafers or giant smarties
  • Licorice whips or licorice string
  • Fondant, if desired
  • Toothpicks, if necessary
  • Food color pens (only if you already have them!)

How to assemble:

1.  Dye your frosting the desired shade.  (If you are making black spiders, I would suggest starting with chocolate icing, then adding black food dye.  You won't have to use near as much coloring!)
2.  Place the star piping tip into your piping bag.  Fill with the colored frosting and begin piping stars randomly all over the cupcake.  Pull the piping bag straight up to give the spider a "spiky" texture or keep the  tip close to the surface of the cupcake to make the spider look flatter and slightly fluffy.  Alternatively, for a different look, you can also pipe random strings, still using the star tip, all over the cupcake.  (This is the method I used on the spider in the picture.)
3.  Cut licorice to the desired length for the legs of the spider.  Push them into the icing, then place additional small dabs of icing on top of the licorice to help hold it into place.  If you find the legs will not stay affixed, you can use toothpicks to hold them.  Just be sure that you tell everyone who will be eating the spiders that they need to be careful of the toothpicks!
4.  Place two Necco wafers or giant smarties at the front of the cupcake.  Using either a food color pen or a toothpick and your food dye, place a small dot on each wafer for the spider's eyes.
5.  Add any additional fondant or buttercream details.  Some ideas might be bows (as in the picture), fangs, or even hats...you're only limited by your imagination!

Happy baking!


25 October 2011

Perfectly Popped Popcorn


Why would you want to pop your own popcorn?  Well, it's cheaper, and you can control the flavor...those seem like two perfectly good reasons to me!  So next time you make popcorn, try this method.  You'll have very, very few un-popped kernels, nothing burns, and either a healthy snack or the perfect ingredient for that caramel corn recipe you've been hanging on to!

You'll need:
  • 3 Tbsp canola or peanut oil (really any type of oil, as long as it has a high smoke point, but do not use vegetable oil!)
  • 1/3 cup popcorn kernels
  • 3 to 4 quart covered saucepan
  • Melted butter (if desired)
  • Salt or other seasonings (if desired)
How to do it:
  • Heat the oil in the saucepan on medium high heat.
  • Put 3 or 4 popcorn kernels into the oil and cover.  Have the rest of your popcorn kernels ready!
  • When the kernels in the pan pop, add the rest of 1/3 cup of kernels in an even layer.  Cover the pan, remove from the heat and count to 30.
  • Return the pan to the heat.  The popcorn should begin popping all at once.  Once it really starts popping, shake the pan back and forth, gently, over the burner.  For drier, crisper popcorn, try to keep the lid slightly ajar to allow the steam to escape, just be mindful of the steam and possible hot oil drops!
  • Once the pops are several seconds apart, remove from heat and pour immediately into a large bowl.  Add melted butter, salt, or other seasonings to taste, then toss to coat.
This recipe yields about 2 quarts of popcorn (approximately 8 cups) or 2 servings.

A few additional tips/suggestions:
  • If you know you want salted popcorn, you can add the salt to the hot oil.  Then as the popcorn pops, the salt will distribute among the kernels.
  • Some toppings to try:  Garlic salt, cayenne pepper, smoked paprika, grated Parmesan cheese, etc.
Find the printable of this recipe here.

Mmm...tasty!


04 October 2011

How-To: Roast Pumpkin Seeds


It's October! Which means one of my favorite holidays is coming up...Halloween!  If you're planning to carve a pumpkin this year, don't throw away those pumpkin seeds.  Keep them to roast - they make a delicious low-carb snack and by roasting your own, you can choose to flavor them nearly any way you like, though they are yummy without any extra seasoning.  

Here's how:
You'll need: 
  • pumpkin seeds (or any squash seed)
  • a small amount of oil or butter (if adding seasoning)
  • any seasonings of your choice.

1.  Preheat the oven to 250°F (or 350°F for quicker roasting, but you'll have to keep a close eye on the seeds!).
2.  Wash any pulp off the seeds, then pat dry with paper towels.  If you're not seasoning seeds, skip step 3; go directly to step 4.
3.  If you're going to season your seeds, toss them with the oil or butter.  (Don't over do it though; adding too much oil will result in greasy seeds, usually 1 1/2 to 2 tablespoons per 2 cups will be plenty.)  Add seasonings, then toss to coat.  
4.  Lay the seeds in a single layer on a parchment paper covered baking sheet.
5.  Bake seeds for 45 to 60 minutes, or until they are no longer soft and have begun to brown around the edges.  Stir occasionally to ensure even roasting.

Some ideas of seasonings to try:
  • Olive oil and salt
  • Butter, garlic salt, and Worcestershire sauce
  • Butter and pumpkin pie spice
  • Butter, sugar, and cinnamon
Mmm....tasty!


30 August 2011

How-To: Toast Nuts


We've all done it...come across a recipe that calls for TOASTED pecans, almonds, or some other type of nut.  And instead of taking the time to toast them, we just toss nuts straight from the package into the recipe.  But, I beg of you, next time...DON'T!  It doesn't take long to toast nuts (usually only about 15 minutes tops) and the results are magical!  Toasting nuts allows the flavor and texture to deepen, and also makes them easier to chop, crunchier, and less likely to sink in batters and mixes.

If you've never toasted nuts before - don't be intimidated!  There are several ways to accomplish the task, in fact, you can even use the microwave!

Toasting Nuts - Microwave Method
Spread a single layer (approximately one cup) of nuts on a microwave safe plate.  Cook on high power in 1 minute intervals until the nuts begin to smell and taste toasted.  **Microwave toasting will not yield the beautiful deeper brown you get from pan or oven toasting.

Toasting Nuts - Pan (i.e. stove top) Method
Heat a large skillet on medium high heat.  When the pan is hot, add a single layer of nuts.  Do not add any oil or cooking spray - the nuts have enough natural oil to cook sufficiently without sticking.  Cook until the nuts begin to smell toasted and have turned a pleasing golden brown color.  Remove from heat.

Toasting Nuts - Oven Method
This is the method I use most often...and is recommended for making large quantities.
Preheat the oven to 350°F.  Spread the nuts in a single layer on a baking sheet.  Bake according to the chart below or until the nuts begin to smell toasted and have turned golden brown.  You may wish to stir the nuts or turn the pan halfway through the cooking time to help ensure even toasting.

Nut Type Suggested Time
Almonds, sliced 7 - 10 minutes
Almonds, whole 10 minutes
Chestnuts 25 minutes
Hazelnuts 12 - 15 minutes
Macadamia Nuts 12 - 15 minutes
Mixed Nuts 15 - 20 minutes
Peanuts (in shell) 15 - 20 minutes
Peanuts (shelled) 20 - 25 minutes
Pecans 10 - 15 minutes
Pine Nuts 5 minutes
Walnuts 10 - 15 minutes

23 August 2011

How-To: Roast & Steam Peppers


Love the taste of roasted peppers, but hate having to shell out for the jarred ones at the grocery?  If so, try this tasty tip!

To Roast Peppers:
  • Preheat your oven's broiler OR turn your heat source (i.e. an open flame on a gas stove, outdoor grill, or even a campfire) to HIGH.
  • If desired rub the peppers with a couple of tablespoons of oil. Do Not use extra virgin olive oil due to its low smoke point.
  • If using the broiler, place the peppers on a baking sheet; then broil until skins begin to appear charred in spots.  Using tongs, turn the peppers, and repeat the broiling process until the skins begin to blister/char evenly on all sides.  
  • If using an open flame, grab a pair of tongs and your first pepper, then pass the pepper through (or as close to) the open flame as possible.  Turn the pepper and continue passing through the flame until it is evenly charred.  (Times will vary widely depending on the type of pepper and your heat source, so don't wander off!)
To Steam & Clean Peppers:
  • Immediately after charring the skins, place the peppers in a zippered storage bag along with a damp (not wet) paper towel or two.  Seal the bag tightly and allow to steam for 10 to 15 minutes, or until the peppers are cool enough to handle.
  • Remove the peppers from the storage bag and peel away and discard the charred skin.  Most of the skin should slip off fairly easily, but if it doesn't, don't fret, it will add additional flavor!
  • Once the skins are removed, pull the stems out of each pepper, then invert the pepper over a bowl and use your hand to squeeze out the bulk of the seeds and pulp.
  • Slit the peppers open with a knife and spread them out ribbed side up.  Using the backside of your knife, scrape out any remaining seeds, ribs, and/or membrane.
  • Use the peppers in your favorite recipe or store them for future use.* 
Mmm....tasty!


*I'd recommend freezing the peppers in a single layer on parchment paper, then placing in a zippered storage bag.  They'll keep for several months this way.  Or if you're into canning, use either regular olive oil or balsamic vinegar to cover them.  Keep in mind - the olive oil won't leave behind much added taste and can be (mostly) rinsed off, the balsamic vinegar will leave its mark though!

09 August 2011

How-To: Peel a Hard-Boiled Egg


Raise your hand if you've ever had trouble peeling a hard-boiled egg.  *Raising hand.*  Yep, I admit, I too have had this problem before.  And the solution?  A fairly simple one, though it involves more than just how you handle the eggs AFTER cooking.

Step 1:  Make sure the eggs you will be using are less than perfectly fresh.  By this, I mean that you want the eggs to be at least several days old...fresh eggs are nearly impossible to peel because very little air passes through the eggshell.

Step 2:  Bring your less than perfectly fresh eggs to room temperature or, if you're short on time, place them in a bowl of warm water for 5 minutes.

Step 3:  Cook according to your preference/recipe.

Step 4:  When the timer dings, run cold tap water into the pot until the eggs are cool enough to handle.

Step 5:  Tap the ends of the egg on a hard surface, then roll the egg on the counter top to crack the rest of the shell.  Peel the cracked shell away from the egg under COLD running water.

Step 6:  Enjoy your handiwork!