Advance Notice

No new orders are currently being scheduled.

31 July 2012

Chill Out


One of the biggest worries I encounter when planning a party is how to ensure the canned and bottled drinks are cold come party time, and how to keep them that way.  I don't usually have the refrigerator space to store them; putting them in the freezer could result in exploded cans and busted bottles; and icing them down in a cooler takes just as long as the fridge plus I have to remember to start the process early.  

My solution?

Place the warm bottles or cans into a large bowl, bucket, the kitchen sink, or even a clean water tank and cover the drinks completely with ice.  Add water enough to cover the drinks and ice, then add 1 cup of salt (either rock or granulated) for every 3 lbs of ice; stir/swish the mixture around occasionally to help the drinks cool faster.  You'll have cold drinks in mere minutes - about 3-5 minutes for a 6-pack!  It will take a bit longer the more cans/bottles you have (bottles take a bit longer to cool than cans), but it still beats waiting hours for cold drinks.  Oh, and be sure to rinse the bottles and cans off before opening, otherwise you'll end up with a nice salty addition to your drink.

Mmm...tasty!


25 July 2012

Things That Begin With "B"

I still remember those Sesame Street segments where they had a letter of the day and then gave words that started with that letter - you know, "C" was the letter of the day, so "cat," "cup," "car," etc were some of the possible words that might come up.

Do they even still do that segment?  Is Sesame Street even still on air?  I hope so, I have fond memories of that show.

Anyway, the whole point of that little trip down memory lane was to provide some background/idea of where we will be going with today's post.  Best be beginning.  (See what I did there?)

Things that Begin with "B"...
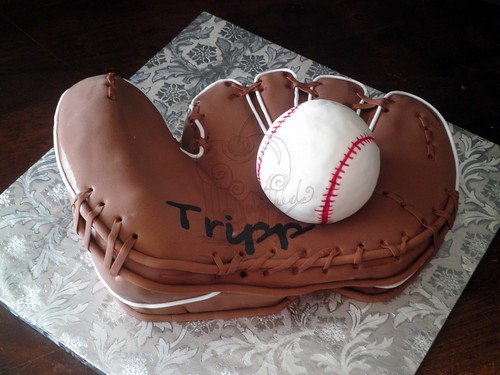
Baseball Glove

P7060148_cew

The glove was covered in fondant and the ball was made from rice krispies, then also covered in fondant.  Adding the lacing details to the cake was a test in my patience, but it wouldn't have been the same without!

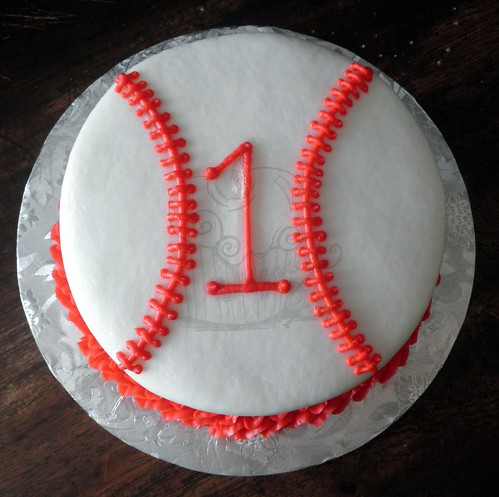
The baseball glove cake was for a 1st birthday, so there was also a matching smash cake.  Guess what it resembled?  If you said a baseball, you'd win the prize...assuming we gave away prizes for that kind of thing around here...

P7060132_cew

Another thing that starts with the letter "B:"  
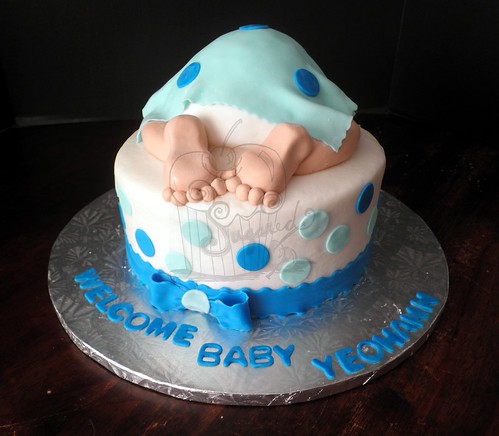
Baby Bottom

P7060164_cew

This cake design has been fairly popular for a while now, yet this is the first one I've done.  The feet weren't nearly as difficult to model as I thought they might be; though I did find myself double and triple counting the toes to make sure I got five on each foot.

What else begins with "B?"
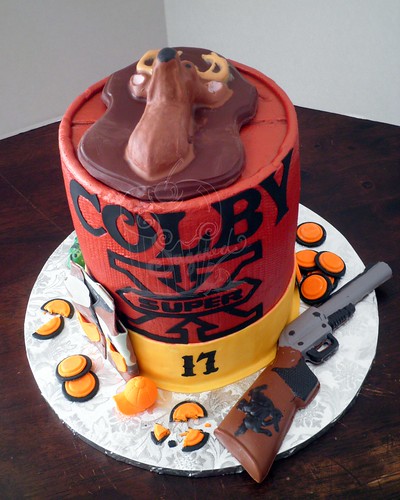
Bullet

P7130032_cew

In this case, technically, a shotgun shell, but let's not split hairs.  The deer head and gun were made from chocolate (my first attempt at painting molds to get multi-colored chocolates!), while the vest, hunting cap, and clay pigeons were made using gumpaste and fondant.  The cake was mostly buttercream, though the "brass" of the shell was fondant.

One last thing that begins with "B:"
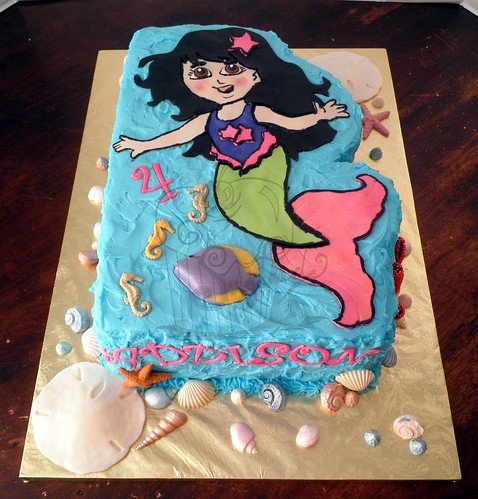
Beach

P7140037_cew

Stretching a bit with this one perhaps, but it does have a "beachy" feel!  The seashells were molded using gumpaste and the mermaid was hand cut from fondant, then pieced together on the cake.  The fish was chocolate; yes, I was trying out my new technique.  This mermaid was a character from one of the birthday girl's favorite movies, and so I knew I had to get as close to the original as possible.  And, I thought I did a good job, until the birthday girl saw the cake - her immediate response was "her tail is the wrong color."  (The original character has a pink fading into yellow tail, I went with a pink and yellow swirled one.)  Just goes to show that small children do pay attention to the details, and they can sometimes be your toughest critic!

Talk to you soon!


24 July 2012

No Punch Bowl


Throwing a party, but don't have a punch bowl?  Or you need an extra because you're serving more than one drink?  Try using an over sized wide mouth jar, or a pretty decorative tub or bucket.  Just make sure the item is either plastic or glass (metal items may not be safe for food use or could possibly lend a metallic taste to the beverage); also make sure it will hold the liquid without leaking and that the container has been properly washed/cleaned before use.  Just add a long handled ladle and viola, instant punch bowl!

Mmm...tasty!

17 July 2012

Ingredient Substitution: Cumin


My sister called me the other day needing to know what spice she should substitute for cumin, and while nothing tastes quite like cumin - a little nutty, a bit bitter, and just a touch of peppery heat - a good alternative is chili powder.  Why?  Most chili powders contain cumin, so they are a good option.  But, if you are allergic to cumin or not a fan of chili powder, you can also try ground coriander or caraway seeds.

For best results, regardless of which substitute you use, start with half as much as the recipe calls for, then adjust upwards to suit your taste.

Mmm...tasty!


10 July 2012

A Moment of Silence

Won't you join me in one?  Why?  Because my KitchenAid hand mixer officially gave up the ghost this past week.

Oh, I know...it was just an appliance.  But, you have to understand, this particular appliance was my very first mixer!  It's been with me for years, and has served faithfully throughout.  True, I was probably harder on it than I should have been, but it always rose to the occasion.  So, please, just a moment...

While we reflect on the loss of my hand mixer, how about a look a some of the last few cakes and cupcakes it helped create?

P6210013_ew

Cupcakes!  Yep, those are "Good & Plenty" licorice candies serving as decorations for some of the cupcakes.  I had thought they were purple and white (don't know where I got that crazy idea) so imagine my surprise when I opened the box and they were pink and white instead.  They still worked though!

P6161489_ew

More cupcakes!  These were topped with fondant daisies and royal-icing piped "K" monograms.  I loved the color combination.

P6181503_cew (Front View)

This cake was chock full of personalized elements.  And, while cakes like this require massive amounts of time to bring together, they are some of my favorites.  Everything on this cake was a nod to the recipient in some way...from inside jokes with her co-workers (it was a farewell cake) to her favorite hobbies.  Here's the back side of the cake:

P6181515_cew (Back View)

I think my favorite element was the "cherry cheesecake."  It was made from rice krispies, but looked exceptionally like the real thing.

P6280059_cew

And, my favorite cartoon character makes a return!  Complete with the burgers, of course.  Scoob was made using a shaped pan (the client had purchased it to make the cake herself, but life intervened), then he was placed on a larger sheet cake in order to yield enough servings for the party.  I had almost forgotten how easy the manufacturer makes decorating one of these cakes look.  Not quite so simple in real life...and I even sort of know what I'm doing!

Talk to you soon!
Oh, a replacement for my defunct mixer?  I acquired one, but am not impressed.  It isn't KitchenAid brand, so to be fair perhaps I'm comparing apples to oranges, but all the same...it's always so hard to live up to the original isn't it?

Custom Colored Sprinkles


Need sprinkles of a specific color, but know you won't be able to find them at your local store?  Let's face it...shopping there usually means chocolate or rainbow or some strange mix of colors to suit the next upcoming holiday.  The solution?  Color your own!

How?  First, stock up on plain white sprinkles (you can usually find them on amazon.com or a bakery supply website).  Second, fill a jar with the white sprinkles and add powdered food coloring or "petal dust" and shake.  Viola!  Custom colored sprinkles in seconds!

Mmm...tasty!

03 July 2012

Double-Duty: Ice Cream Maker


Oh, sure, you can use your ice cream maker to churn endless varieties of ice creams and sherbets, but why not use it to make frozen drinks, as well?  It can be a bartender's best friend!  

Just add the cocktail ingredients to the bucket (you won't need to add any ice since the ice cream maker will do the freezing) and let churn for about an hour before the party.  Once the mixture is slushy, place the bucket on the table for guests to scoop their own.  Easy peasy!

Mmm...tasty!


02 July 2012

4th of July Strawberries

Well, they don't have to be relegated to just the 4th of July...you can make them anytime you want.  Though with the red white and blue color scheme they are perfect for the upcoming Independence Day holiday.

I happened to have a red, white, and blue nonpareil mix on hand, so I decorated a few of the berries with it rather than just the plain blue sprinkles.  But, I think I prefer the look of the blue ones over the triple colored...

You can use any type of white candy coating or white chocolate, it's entirely your preference.  If you use white chocolate, it will be more ivory than white and it will typically give you a much thicker coating (unless you thin it slightly with a bit of vegetable oil) than white almond bark or candy melts.  These are best made the day of your party, but you can hold them overnight in the refrigerator, if needed.

4th of July Strawberries
Printable Recipe
P6300098_ew

Ingredients:

  • Fresh strawberries, rinsed and dried (or wiped clean with a damp paper towel)
  • White chocolate chips OR white almond bark OR white candy melts, melted
  • Blue sprinkles or nonpareils
Preparation:
  1. Make sure the strawberries are completely dry before you begin dipping them.  Any water could possibly cause your coating to seize, making it unusable.  Line a sheet pan with parchment or wax paper.
  2. Microwave your coating (chips, bark, or melts) in 30 second intervals, stirring after each, until just melted.  Keep an eye on the coating; white chocolate burns quickly!
  3. Dip each strawberry at least halfway into the melted coating.  Tap the excess coating off, then immediately shake the sprinkles/nonpareils over the bottom half of the dipped portion of the berry.  (I find it is handy to apply the sprinkles over a small plate or bowl, so I can catch the extras then re-use them.)
  4. Place the dipped and sprinkled berry onto the parchment lined pan.  Allow the coating to harden completely before removing from the pan.  (You can pop them in the refrigerator to speed the hardening process.)
Happy eating!