Advance Notice

No new orders are currently being scheduled.

26 April 2012

Eau

That's French for "water."

Or how you pronounce "O" when referring to the Cirque Du Soleil show.

Stumped?  Not sure what I'm referring to?  Then welcome to the boat I was in last week when I received a request for a cake based on "O".  Luckily, I have the world wide web...and the willingness to spend a while researching.

Here's the cake:

P4180753_cew

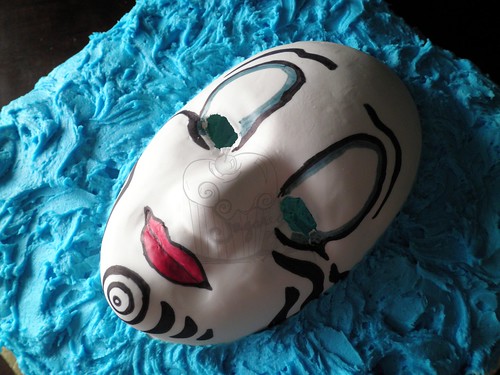
Lots of water, an umbrella (from what I gather one of the main characters uses an umbrella as a boat in the show) and a mask similar to the show's advertising poster.  

Here's a different view of the mask.  It was molded from gumpaste and then hand-painted.  (Oh, and special thanks to Pax for coming to my rescue and mailing me a few supplies!)

P4180738_ew

I've never been terribly interested in seeing any of the Cirque shows, but after researching them for this cake,  I have to say, my curiosity has been piqued.  If the opportunity came along to see one, I'd be more inclined to attend than in the past.  Who says cake decorating doesn't expand your horizons?

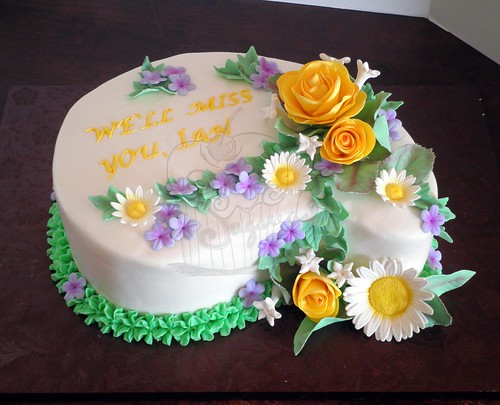
Aside from the "O" cake, I also made this pretty spring themed birthday cake.

P4170727_cew

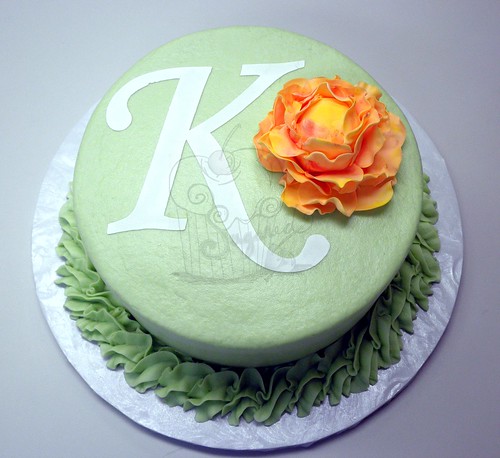
The flower is a loose interpretation of a peony.  And the monogram was cut from an icing sheet using the Silhouette cutter.  (I've decided the best, and in my opinion, only thing to use the electronic cutter to cut is icing sheets...no more fussing with gumpaste sheets for this girl.  I can hand-cut gumpaste faster than I can prep and cut it with the Silhouette!)

And, cupcakes for a spring-themed wedding shower. 

P4220774_cew

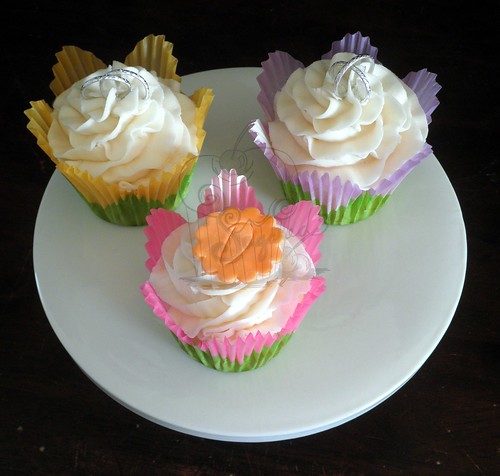
The monogram centers were cut from gumpaste and were edible.  The intertwined silver rings were not edible (boo!), but there was no possible way I could make over 100 of them and still have them look dainty, round, and similar to each other.  Sometimes you just have to know your limits!

Talk to you soon!

24 April 2012

Coffee Filter, Not Paper Towel


Next time you have to clean the mirrors in your house (or any glass surface for that matter), use coffee filters, not paper towels.  The coffee filters leave no streaks or lint - and they are cheap!  (Or, try this similar tip!)

Mmm...tasty!


20 April 2012

M&M Cookie Pie

Because sometimes you want cookies...without all the chilling, scooping, and cookie sheet washing that typical cookie making requires.

Sometimes you just want a cookie...sooner rather than later.

My solution?  Cookie pie!  In today's version, M&M Cookie Pie.  And, it's even ready in about 30 minutes if you prefer a slightly doughy-softer-brownie-ish center, like yours truly.  Though, if you prefer a more thoroughly baked cookie, just add a few minutes of baking time; you know the drill - when a toothpick inserted in the center comes out clean, it's done!  Just be sure you don't catch an M&M, the melted chocolate will defeat your testing attempts.

M&M Cookie Pie
Adapted from: Adventures in My Kitchen
Printable Recipe
Yield:  1, 9-inch cookie pie

P4190759_cew

Ingredients:
  • 1 cup + 1 Tbsp Flour
  • 1/4 tsp Baking Soda
  • Pinch of salt
  • 3/4 cup butter, softened
  • 1/2 cup packed brown sugar
  • 1 egg
  • 1.5 tsp vanilla extract
  • 1 cup chocolate M&M candies
Preparation:
  1. Preheat oven to 325°F.  Cream the butter and brown sugar until fluffy.
  2. Add the baking soda and salt and mix until combined.
  3. Add the egg and vanilla extract, blend until incorporated.
  4. Add the flour and mix well.
  5. Fold in the M&M candy pieces.  Pour into a greased 9" pie pan, bake for 25 to 30 minutes, or until center tests done to your liking.  Cool, then cut into slices to serve.
Mmm...tasty!


18 April 2012

Beginnings, Blue Jeans, & Birthdays

Beginnings:
In this case, the beginning of taking two independent "I"s and merging them together into one "we"...an engagement!  (As though the silhouette on the cake didn't kinda give that one away.)

P4130700_cew

Your eyes are not deceiving you, the middle tier is considerably taller than most of the tiers I make.  In fact, it's twice as tall (a.k.a. a "double barrel" or "extended tier").  Madre helped me deliver this cake, and she was pretty concerned about the transport; to be honest, I was too.  Rough dirt roads and cattle guards are not the optimum driving surface for cake deliveries...but, by crawling along at a snail's pace (we're talking 25 mph or less) the cake arrived safely!  

Side note:  in the interest of full disclosure - the ribbons/bows and crystal centers were not edible.

Blue Jeans:
No, it's not a picture of me in my best pair (you didn't really want to see that anyway!), but it is blue jean pocket sugar cookies.  Complete with tiny red bandannas!  And "stitching!"

P4130692_ew

And, speaking of jeans, check out one of my upcoming projects (yes, I needed another item on my list of to-dos) - the Green Jeans 5K.  There's not a whole plethora of information available yet since we (my sisters, nieces, and I) are still working out the kinks, but I think it will be a fun event.  If you're in our area, or even if you're not, and want to participate we'd love to have you join us.  There might even be food involved! *wink, wink*

Birthdays:
Just one...mine!  Hehe!  No need to worry about how old I am.  Let's just say I'm old enough to know better and still too young to care.  Age is just a number anyway - you are as young as you feel!  

Best thing about this birthday?  Madre made me chicken fried steaks with all the fixins...we're talking hand-breaded chicken fries, scratch cream gravy, homemade dinner rolls, corn, mashed potatoes, green beans...it was heaven on a plate.  And the icing on the top was I didn't have to cook any of it!  (It's nice to have someone cook for me every once in awhile!)  I did make dessert though:

P4150721_cew

No cake - Madre offered to make one or have one made for me, but I declined.  Instead, I made a bourbon pie (sorry no pics!), and that yummy-ness you see up there.  It doesn't really have a name...something along the lines of "Cookies 'n' Cream brownie cake" maybe...I was free styling when I made it...but it was tasty, once we got it pried off the bottom of the pan.  Yes, it stuck like glue - the recipe needs a little work if it's going to stay in the "usable/shareable" category.

'Til next time!


17 April 2012

Lighten the Load


I don't know about you, but my green thumb is really starting to itch.  And, if you're anything like me, you love the look of those giant planters overflowing with lots of greenery and color.  The only problem with these planters - they require large amounts of soil to fill and super human strength to move once they are filled.  

An easy way to help solve both these issues is to fill the planter about a quarter to a third of the way full with packing peanuts, then add the soil.  (Make sure you use the old school Styrofoam peanuts, and not the new corn-based ones that are biodegradable.  The corn-based packing peanuts dissolve quickly in water.)  Doing so will lighten the load of the planter (making it easier to move), will improve drainage, and will save money on potting soil.

Happy planting!


13 April 2012

Sweet Cream Fruit Dip

Because it's Friday and my day off.

Because it's Spring.

Because I'm constructing a cake this weekend that has me a wee bit stressed out and I need a "healthy" sugar fix.  (Oxymoron, I know...)

And, because I haven't shared a recipe with you in a bit, I give you...

Sweet Cream Fruit Dip
Printable Recipe
Yield:  Approximately 1 cup


Ingredients:
  • 8 oz cream cheese, softened
  • 1/3 cup sour cream
  • 2 Tbsp packed light brown sugar, plus additional for serving, if desired
  • 1 1/2 tsp vanilla extract
Preparation:
  1. Beat the cream cheese, sour cream, brown sugar, and vanilla extract in a bowl with a mixer until smooth and well combined.
  2. Chill before serving.
  3. Sprinkle with additional brown sugar before serving with grapes, strawberries, etc.
Doesn't get much simpler than that.  But, it is super yummy!

Happy dipping!

11 April 2012

Rabbits, Chicks, and Eggs...Oh, My!

Once again, as is almost always the case around here, I'm sharing holiday goodies with you after the holiday.  But that's just how the cookie crumbles, and, to put a positive spin on it...I'm giving you a heck of a good jump on planning for next year!

With that in mind, maybe for Easter next year you'd like to make some cute cake balls or cake pops decorated to look like eggs (in many varieties), chicks, and rabbits.

P4070645_cew

(I call this photo "The Lineup," and it represents many, many hours of work.)  I think the rabbits are my favorite - it's their marshmallow ears, just too cute!

And, after you've made all your cake balls/cake pops, why not put them into a couple of cute Easter baskets, maybe even use some edible grass to really carry out the idea!

P4070648_ew

Ah, yes...the wheels are turning...I can see the ideas taking shape in your mind's eye for next year's extravaganza.  Be sure to take notes!  I don't want you to forget anything!

A large part of Easter is about the basket (see above), but why not consider an Easter present, in cake?  All tied up with a pretty bow and ribbon.

P4060599_cew

Or, maybe invite a couple of bunnies to the party.  

NO, not those kind of bunnies!  These bunnies; though you'll want to keep a close eye on the bunny next to the bow...

P4060632_cew

Or, maybe you need ideas for a unique cookie for Easter brunch.  How about these apple pie cookies?  A fun, multi-step, several hour long process cookie that will leave you wondering why you agreed to make them for your dear niece who insisted you wait to make them until she was home.  You were thinking, of course, that she wanted to help construct them, only to be told she just wanted to taste-test them, not help make them. *sigh*  But, that being said, they were really rather fun to put together and tasty, too!

P4070675_ew

And, of course, you'll need a few dyed eggs for hunting.  May I suggest these marbled beauties?  Dyed using shaving cream and food coloring.  A rather messy process, but the results were pretty spectacular.  Oh, and bright color combinations seem to work best; the darker colors seemed more camouflage than marbled...

P4080681_ew

Got your notes all written up?  Perfect!  Just make sure you put them in a safe place, so that you'll have them at the ready for Easter next year.  Hehe!

Talk to you soon!


10 April 2012

Medium? Large? Extra Large?


Or maybe even Jumbo?  

If you've every wondered what size egg to use in a recipe that doesn't explicitly state a size, then wonder no more!  If the recipe doesn't give a size or weight measurement for the eggs, then always use large.  Why?  Because most recipes (unless they specify otherwise) are written based on the use of large eggs.  You can use eggs of a different size, of course, but keep in mind that doing so will have an impact on how much egg is in the recipe (smaller eggs will yield less "egg" volume, larger eggs will yield more "egg" volume.)

Mmm...tasty!


04 April 2012

April Showers

Yeah...that title doesn't have anything at all to do with any of the cakes I'm going to share with you in this post.

But, it does have everything to do with the fact that it FINALLY rained here!  And, I'm not talking about our typical "see the lightning, hear the thunder for two hours before hand, then the wind blows 50 mph and the rain falls horizontally for 5 minutes, if you're even in the lucky 1 mile area that receives rainfall, and then skies clear like the parting of the Red Sea."

Oh no, this was a gentle, soaking rain that lasted for most of an entire day- 24 HOURS, people!  I've heard tell that this phenomenon happens in other places, and now I've finally witnessed it firsthand!

So, anyway...yep, it rained.

Wanna see the cakes now?

Here's a cute pink, black, and white themed gift cake for a baby shower.  All wrapped up with fondant ribbons and a gumpaste bow!

P3240517_cew

Yellow roses, white daisies, and purple blossoms - looks like spring to me!  The flowers and lettering were done in gumpaste by yours truly.

P3250535_cew

My first attempt at a 3D gumpaste bottle; one of these days I might even get brave and try a sugar version!  I should probably refine my gumpaste attempts first though...

P3300573_ew


Another pink, black, and white schemed cake - though this one was all about bling, feathers, and flowers. Yes, the bottom tier is buttercream (a rather snazzy technique, eh?), and, no, the feathers and pearl rhinestone pieces are not edible.

P3300564_cew

This isn't a cake in the traditional sense, but it was soooo good!  Caramel, peanut butter, chocolate (both dark and white), graham crackers, and chopped up candy bars...  What is it, you ask?  It's a Snickers Freezer Cake, and I am working on the recipe to share with you!  (The recipe that inspired it was a fail, but sometimes amazing things come out of disasters.)

P3300584_ew

And, this week's final act - Easter egg shaped cake pops!  To help get you in the mood for the upcoming holiday, of course.  

P4010589_cew

What?  You say you thought Easter was still a few weeks away?  Oh no, my dear.  It's this coming Sunday; how time flies when we are having fun!  I'm working on my menu and crossing my fingers that I can get everything completed and still find a few hours to sleep...

Happy Easter!

03 April 2012

"Egg"cellent Egg Decorating Ideas


Easter is just around the corner!  This Sunday in fact!  If you're anything like me, you take great joy in finding new and creative ways to dye and decorate Easter eggs.  Here's a few of my favorite ideas:
  • A clear or white wax crayon.  Draw on the egg before dyeing, or dye a base color, allow it to dry, then draw a design with the crayon, and dye in a different color.  Repeat as desired for a multicolored/layered effect!
  • Rubber bands.  Wrap the bands loosely around the egg in several different directions, then dye.  Can be repeated with different wrappings and dye baths to create a layered effect.
  • Old silk ties/shirts/etc.  Here's the rundown on how to use this method:  Silk-Dyed Eggs
  • Colored Candles.  Allow the wax from a lighted colored candle to drip onto the egg
  • Tissue Paper.  Cut sheets of colored tissue paper into small squares or simple designs.  Using a wet paper towel, dampen the egg, then apply the tissue paper.  Gently press a damp paper towel over the tissue paper (on the egg), then remove the towel and tissue paper to reveal the design!
  • Stickers/Masking Tape.  Apply the stickers or masking tape in whatever design you wish.  Dye the egg, then remove the stickers/tape.
And, one last tip...do you hate those puddles of dye that collect at the bottom of your Easter eggs while they dry?  If so, then before placing them on the drying rack, take a clean, dry paper towel, and gently wipe the excess dye off the egg.  This will prevent the "dye puddle" and will also give you a more even color as the egg dries.

Happy Easter!

Mmm...tasty!