
27 February 2014
Sonic Boom
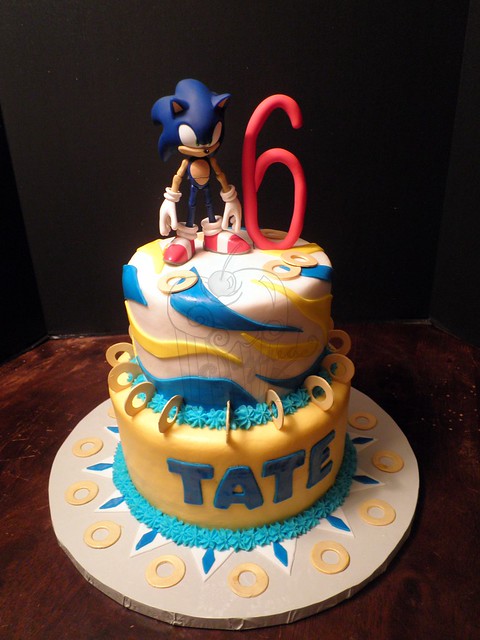
First up, I didn't know Sonic (the hedgehog, not the franchise) was even still in existence, much less that he was still popular with the kiddos. Apparently he is though - proof? This cake:
25 February 2014
What's the Difference? Baking Powder vs Baking Soda

So, what's the difference?
The simple answer: Baking soda needs an acid. Baking powder has an acid.
The long answer:
Since both baking soda and baking powder act as leaveners, they are used in baking to make doughs rise. Because their chemical reactions occur quickly, they are most often used in "quick bread" recipes (i.e. muffins, biscuits, scones, even pancakes).
When using baking soda in a recipe, remember that it needs an acid in order to activate a chemical reaction - an ingredient such as buttermilk, sour cream, lemon juice, vinegar, yogurt, etc. Think back to your science class days, did you ever build a baking soda and vinegar volcano? If so, you were witnessing the reaction of acid + sodium bicarbonate (i.e. baking soda) = release of carbon dioxide; this release of gas is exactly what you want to happen in your dough, it means it will rise! Failure to include an acid will result in the baking soda not being activated which equals flat biscuits. This also means if you try to sub baking soda for baking powder in a recipe where no acidic ingredient is present, you'll have a flop result.
Baking powder, on the other hand, already contains the acid; it's actually baking soda mixed with an acidic compound. This means that you don't have to include any additional acidic ingredient - the soda and the acidic compound that make up the baking powder won't start their chemical reaction until you moisten them. If your baking powder is labeled "double acting," this means that the chemical reaction will be further activated by the heat of the oven/griddle/heat source.
Can you substitute one for the other? In theory, yes, but all too often the results will not be pretty. If you substitute baking powder for baking soda on a 1:1 basis, you won't get enough rise in your dough; baking powder is approximately 1/3 soda and 2/3 other ingredients, so you'll only be adding a third of the soda you need. Alternatively, if you were to sub baking powder for baking soda on a 3:1 basis, you'd risk having a bitter taste and too much leavening, meaning the dough would quickly rise and then fall before the bubbles had a chance to bake, translating to a flat, tough biscuit or scone. If you try to substitute baking soda for baking powder, you will likely be missing an acid, which means the soda won't activate and you'll have flat baked goods. Additionally, because soda has a metallic taste that is typically neutralized by the acid, you'll also be risking ending up with a metallic tasting muffin. It's much easier just to keep a box of baking soda and a can of baking powder on hand!
Mmm...tasty!

21 February 2014
Tutorial: Candy Melt Inscription Transfers
One of the things I dislike most about cake decorating is writing on cakes. I don't have "pretty" handwriting even on paper. Is my handwriting distinctive? You bet. Is it "pretty?" Not even close. And, despite all my schooling, writing in cursive is pretty much not happening, ever. I print. Or type.
Aside from worrying about whether the writing is pretty or not, there's also the worry about correct spacing, making sure the words don't run downhill, not misspelling anything (I live in fear of doing this, I don't want to end up on CakeWrecks because of a misspelling)...needless to say, sometimes it takes me longer to get lettering/wording on cake than it does to decorate the rest of it. It's an exhausting process.
But, one of my methods to help prevent mess-ups and to circumvent the whole "less than pretty" handwriting problem is to use candy melt inscription transfers. Or in other words, to write on the cake using candy melts. Although, technically, I don't write directly on the cake...anywho, here's how it works:

1. Tape the design template to the sheet pan. I typically turn the sheet pan over so I don't have to worry about bumping into the edge of the pan while I'm piping the design.
2. Cover the template with wax paper; be sure to tape the wax paper down so it doesn't move around. Put the sheet pan (template, wax paper, and all) into the freezer while you melt the candy wafers according to the package directions until smooth. Place the piping tip in the piping bag, then fill with the melted candy wafers.
3. Remove the sheet pan from the freezer. Begin piping over your design template.
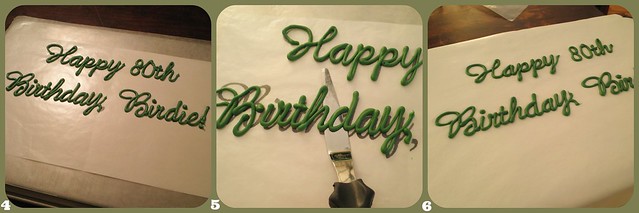
4. Continue until you have piped the entire design. Carefully place the sheet pan back into the freezer, freeze until the candy melts have hardened. Once the transfer is completely set-up, you can remove it from the freezer and keep at room temperature until ready to use.
5. When you are ready to transfer the design to your cake, place the sheet pan with the design still on it, back into the freezer. Allow to harden, usually about 10 minutes or so. Once the design is frozen, remove the sheet pan from the freezer and immediately, but gently, use an offset spatula to loosen the candy melt design from the wax paper. Work quickly, but carefully; you want the pieces to still be semi-frozen when you place them on the cake.
6. Once the pieces are loosened from the wax paper, place immediately onto the cake. Finish decorating, as needed.
Aside from worrying about whether the writing is pretty or not, there's also the worry about correct spacing, making sure the words don't run downhill, not misspelling anything (I live in fear of doing this, I don't want to end up on CakeWrecks because of a misspelling)...needless to say, sometimes it takes me longer to get lettering/wording on cake than it does to decorate the rest of it. It's an exhausting process.
But, one of my methods to help prevent mess-ups and to circumvent the whole "less than pretty" handwriting problem is to use candy melt inscription transfers. Or in other words, to write on the cake using candy melts. Although, technically, I don't write directly on the cake...anywho, here's how it works:
How-To: Candy Melt Inscription Transfers
What You'll Need:
Sheet Pan (or some other smooth, flat surface that is portable,
will hold your design, and will conduct cold well)
Wax Paper
Scotch Tape
Template of the design
Candy melts/wafers in your desired color
Piping bag
Piping tip
Offset Spatula
Iced/decorated cake
What You'll Need:
Sheet Pan (or some other smooth, flat surface that is portable,
will hold your design, and will conduct cold well)
Wax Paper
Scotch Tape
Template of the design
Candy melts/wafers in your desired color
Piping bag
Piping tip
Offset Spatula
Iced/decorated cake
What To Do:
2. Cover the template with wax paper; be sure to tape the wax paper down so it doesn't move around. Put the sheet pan (template, wax paper, and all) into the freezer while you melt the candy wafers according to the package directions until smooth. Place the piping tip in the piping bag, then fill with the melted candy wafers.
3. Remove the sheet pan from the freezer. Begin piping over your design template.
5. When you are ready to transfer the design to your cake, place the sheet pan with the design still on it, back into the freezer. Allow to harden, usually about 10 minutes or so. Once the design is frozen, remove the sheet pan from the freezer and immediately, but gently, use an offset spatula to loosen the candy melt design from the wax paper. Work quickly, but carefully; you want the pieces to still be semi-frozen when you place them on the cake.
6. Once the pieces are loosened from the wax paper, place immediately onto the cake. Finish decorating, as needed.
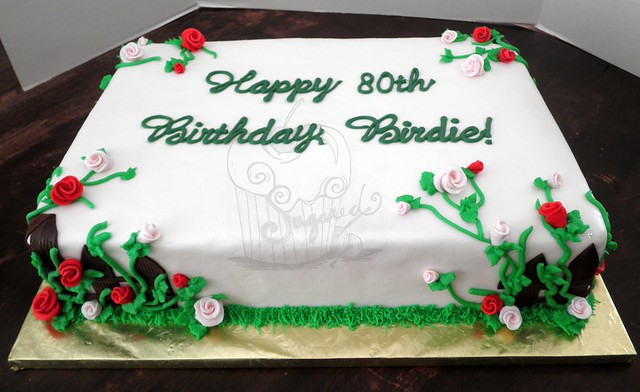 |
| Finished cake with candy melt writing transfer. |
See, easy peasy. Nearly any type of writing can be mimicked using this method, and these types of candy melt decorations can be made days in advance or minutes before use. They really are fairly quick to create once you have all the needed supplies. You can also use this method to pipe fairly simple design elements (hearts, swirls, monograms, etc) to be used as decorations for cakes, mini cakes, and cupcakes.
You're probably thinking, "why all the freezer time?" Well, I've discovered that initially freezing the sheet pan makes the candy melts set-up faster, meaning they will hold their shape better rather than flattening out and possibly running together. Freezing again immediately after piping the design also means that the melts will set-up more quickly, again minimizing the chance of flattening/running. The final freezer visit ensures that the melts are well set-up and cold enough that the heat from your hands won't cause the design to melt while you are applying it to the cake.
Happy caking!
P.S. You can click on the tutorial photos to see larger versions of them.
Happy caking!
P.S. You can click on the tutorial photos to see larger versions of them.
20 February 2014

18 February 2014
Chop Chop
Mmm...tasty!
13 February 2014
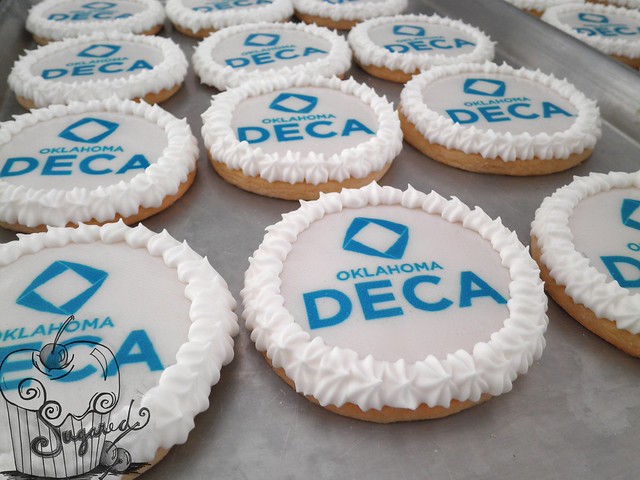
Logo My Cookies
I was recently had the opportunity to create logo'ed cookies for Oklahoma DECA. Exciting stuff! Oh, and I have to give a shout-out to Pax and C.J. for sending the opportunity my way; I'm not sure what their commission will be yet, but I imagine they'll choose something delicious.
I opted to go with edible images on the cookies; there really was no way to create each logo by hand and still make it cost-effective for the client, time-effective for me, and still have all the logos look nearly identical.
I opted to go with edible images on the cookies; there really was no way to create each logo by hand and still make it cost-effective for the client, time-effective for me, and still have all the logos look nearly identical.
I'm not a huge fan of edible images, but there is a time and place for them. This was one of those times.
11 February 2014
The Sweet Spot
Mmm...tasty!
05 February 2014
Castles & Cake Balls
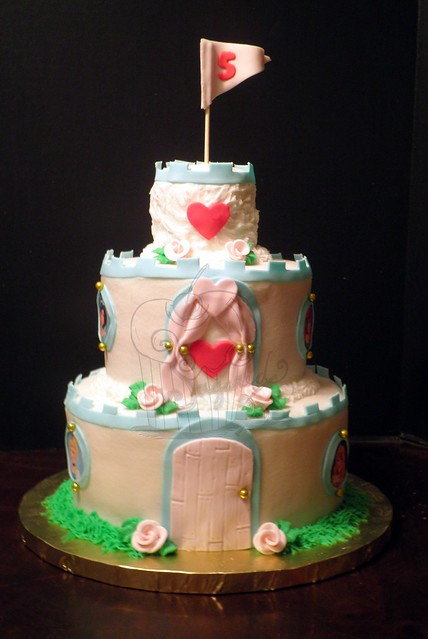
And...
04 February 2014
Shiny or Dull?
The answer? It doesn't matter, either side is fine. The "shiny" side is a result of the manufacturing process. Yes, the shiny side does reflect heat slightly better than the dull side, but the difference is negligible. The one time the side does matter? When you're using non-stick foil - in that case, the dull side is non-stick.
Mmm...tasty!
Mmm...tasty!
Subscribe to:
Posts (Atom)