Advance Notice

No new orders are currently being scheduled.

28 July 2011

Paint Me an Ocean Scene

It is wild and crazy in my cake realm right now, so today's post will be fairly short and sweet. Though to make up for it, I promise to have lots to share with you next week...including my latest cake toy!

Here's the cakes from last week:

P7200733_cew

A painter's palette.  Everything is edible, with only the paintbrush and paint tubes being made from gumpaste, the rest is all buttercream.  This cake really let me get in touch with my inner artist. Hehe.

P7230741_cew

A beach/seashore/ocean themed wedding cake. I apologize for the picture quality; the reception venue was very dark even though it was the middle of the afternoon.  C'est la vie!  All the seashells and the monogram topper are hand molded from gumpaste and airbrushed to have a slight sheen; the "sand" is a various mix of sugars and sanding crystals.  This is the first cake I've ever created with an open space between the tiers.  I love the look, but will definitely be using a different structure system next time...no more Wilton plates and push-in pillars.  They just didn't seem stable enough!  Live and learn!

Gotta go dive back into the sea of cake and buttercream!  Until next week,

26 July 2011

To Freeze or Not To Freeze: Cake Batter


This is an ongoing debate, a lot of sources say you should never freeze cake batter since baking is all about chemical reactions, but, and this is from my personal experience, I've found that you CAN freeze cake batter and still get optimal results.

To Freeze Cake Batter:

Option 1:  Place the fully mixed cake batter into either an airtight container or a zippered storage bag that has had as much air as possible removed from it; label the container with the name of the recipe and the date*.  When ready to bake,  allow to thaw in the refrigerator enough to portion into either a prepared cake pan or cupcake wrappers, then bake as directed in the recipe**. 

Option 2:  Line cupcake/muffin tins with wrappers, then fill as normal.  Cover tightly with plastic wrap and freeze until the batter is frozen solid. (But don't wrinkle the liners, the wrinkles will remain when you bake the cupcakes!  Guess how I know that?)  Once frozen, remove the wrappers from the tray and place in a zippered storage bag.  Remove as much air as possible from the bag; label with the name of the recipe and the date*.  When ready to bake, either allow to come to room temperature or bake from a frozen state, allowing an additional 5 to 7 minutes of baking time.

Option 3:  Place the fully mixed batter into the prepared cake pan, wrap tightly with plastic wrap, then wrap again with aluminum foil; label the wrapped pan with the name of the recipe and the date*.  When ready to bake, allow to thaw slightly in the refrigerator, then remove the plastic wrap and aluminum foil, and bake as directed in the recipe**.

*Cake batter can be frozen for up to 3 months (according to my experiments using an airtight container!); however, for optimal taste and appearance, bake as soon as possible.
**Baking times may need to be extended by several minutes in order to account for the still semi-frozen cake batter.

Bonus Tasty Tip!!
If you plan to use your frozen cake batter to make cupcakes, give one of these methods a try for filling the cupcake wrappers, while minimizing the mess:
  • If you use a zippered storage bag as your freezer container, allow the cake batter thaw completely in the refrigerator, then snip off the bottom corner of the storage bag and pipe the batter into the individual wrappers.
  • If you use an airtight container to freeze the cake batter, allow the batter to thaw in the refrigerator until it has the consistency of soft ice cream, then use your ice cream (or a cookie dough) scoop to portion the batter into the individual wrappers.  Depending on the size of the scoop you use, you may have to do several trial runs to determine how many scoops will yield a full cupcake.

Mmmm....tasty!

21 July 2011

A Bedtime Story?

It has been fairly quiet in my caking realm the past few days.  And I have to say, I'm somewhat glad for it as it has given me time to prepare my game plan for the upcoming weeks.  You'll have to stay tuned to find out why I'm planning sooo far in advance, though. *wink, wink*

As for the cakes this week...here they are!

P7150688_cew

I'm sure you can guess which story this cake is based on...perhaps the characters are a good gimmee hint.  (No, I didn't make them.)  I've seen several versions of this cake and have always thought it would be fun to create, so I'm pleased I finally got to try my hand at it.  The footboard and headboard are made from thickly rolled gumpaste; they were incredibly heavy, so the cake had to be assembled on site in order to help prevent breakage.  The gumpaste was also embossed with a wood grain pattern to make it appear more realistic (though it is rather hard to tell from the photo, my apologies for the quality, but I ran out of daylight about 6 hours prior to taking it...).

P7150668_cew

I tried out a different technique on this cake to try to give the pickup truck a bit of a raised "3D" look.  It worked fairly well, but would probably translate better on a more intricate design - though cutting out lots of tiny pieces multiple times doesn't sound terribly appealing to me.  Good thing I order a new cake decorating toy earlier this week, hopefully it will help cut down on the cutting time.  I'll let you know how it works out...  The keys and driver's license were both made from gumpaste (translation - entirely edible decorations) and the license was hand drawn by yours truly.

Til next time,

19 July 2011

Good to the Last Drop


Hate having to scrape the jar in order to remove as much of the pasta sauce as possible?  If so, try this simply, yet handy trick, courtesy of K.

Place the jar of pasta sauce, unopened and upside down, under hot running water for 3 to 5 minutes.  The sauce will easily empty from the jar, leaving very little behind.  This works best for cream or cheese based sauces (i.e. Alfredo), but it also works well for tomato based ones such as marinara.

Mmm...tasty!

14 July 2011

It's A Small World After All

Just a few cakes to share with you today.  Can you guess what the design/theme of at least one of them was?  (Hint:  Use the title of this post.)

This cake isn't the one whose theme inspired the post title, but it's still a fun cake...as long as you don't mind surfing in shark infested waters.

P7080616_cew

Everything on this cake is edible...the wave, the sharks, even the boards and life preserver.

P7100650_cew

Here's an homage to one half of the ubiquitous mouse pair known the world over...and part of the title inspiration.  Do you know who I'm referring to?  

Oh, and maybe one of you can answer this question for me - when did she go from a red polka dot dress to a pink one?  The mouse of my childhood was always dressed in red!  (I'm seriously interested in the answer, so if any of you trivia buffs out there know, please share your knowledge.)

And, here it is, the title cake...

P7100653_cew

The mouse and his house.  As well as a few of his friends.  (No, I didn't make the figures.)  This cake was a lot of fun to make, very bright and cheerful with lots of components.  Here's a view of the back:

P7100660_cew

It's a small world after all.

By the way, if any of you see K, be sure and sing the song to him.  He'll appreciate it.  After all, he's the one who came up with today's title.

12 July 2011

Skip the Oil


Want to trim the fat and calories from one your favorite baking recipes?  No problem, as long as it is an oil-based recipe (i.e. most muffins, quick breads, and some cakes) and you don't mind a slight change in texture and taste, typically softer and slightly sweeter.

To make this change, simply substitute applesauce for the oil in the recipe.  Typically a 1:1 ratio is suggested, so if your recipe calls for 1 cup of oil, substitute 1 cup of applesauce.

A couple of tips:
  • Start easy.  If the recipe calls for 1 cup oil, start out with 1/2 cup of oil and 1/2 cup of applesauce, bake up the recipe and see if you are happy with the results.  If you are, slightly increase the ratio next time to see how it affects the recipe, you may find that you prefer a tablespoon or two of oil along with the applesauce (rather than only applesauce) to reach the perfect texture and taste for you.
  • Opt for unsweetened.  Use unsweetened applesauce or reduce the amount of sugar in the recipe if you use sweetened.
  • Be adventurous.  If you're feeling particularly adventurous, you can use the same method to substitute different fruit purees for the oil.  (I'd recommend using a fruit that will complement the final flavor of the dish though.)  And, keep in mind, that if you use a dark fruit in a fairly light colored recipe, it will alter the color of the final product.

Mmm...tasty!

06 July 2011

Rockets Red Glare

No cakes this past week...I took a little time off to enjoy myself.  Well, actually I spent most of the cake free days catching up on my to-do lists.  Amazing how everything piles up when you've got cake on the brain 24-7...

I did crank out some good looking cookies (if I do say so myself) and some fun dishes for our firework free Fourth of July celebration though.  After all, I wouldn't want to disappoint you by not having a few goodies for you to salivate and ooh and aah over this week. Hehe!  (And, no, we aren't firework averse in my neck of the woods.  We've just been experiencing one of the worst droughts on record.  All prayers for rain are greatly appreciated!)

As an extra bit of fun today, see if you can guess what the title of this post and the goodies pictured below all have in common.  Answer will be revealed at the end!

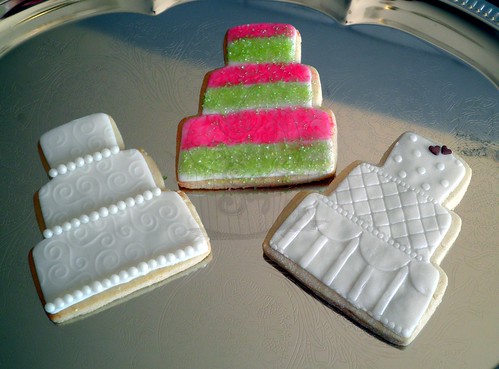
Here's the sugar cookies.  I've titled the middle one the "watermelon wedding" cookie...sort of like the modern design among the more traditional ones flanking it...

P6290575_cew

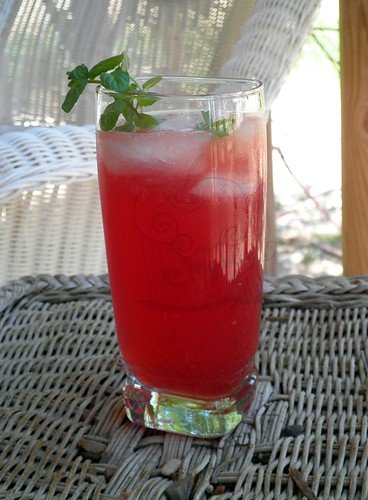
And the beverage I made for the family on Monday - pomegranate-cranberry limeade sparklers.  It's a super simple drink to make and it can be adjusted to suit just about any one's palate; I like to make mine on the tarter side.  You can find the recipe here if you want to give it a try yourself.

P7040588_cew

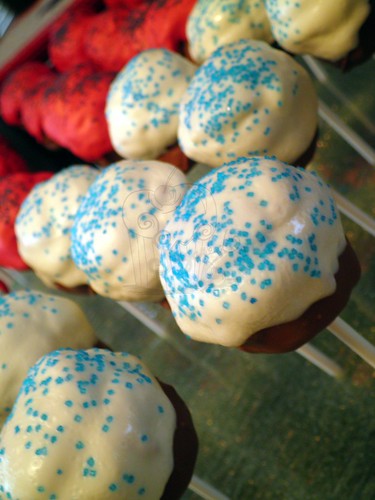
And I know I said I didn't make any cakes this past week...but, truth be told, I did.  But, in my defense, I had very valid reasons for not staying cake free for even one week.  Those reasons were:  a new cake pop making tool that I couldn't wait to try.  (The test run was a little shaky, definitely need to do some work on the process, but no one had any complaints on the taste, even if the appearance was a little rough!)  Yes...I did make them red and white with blue sprinkles.  I was in the holiday mood!

P7030587_ew

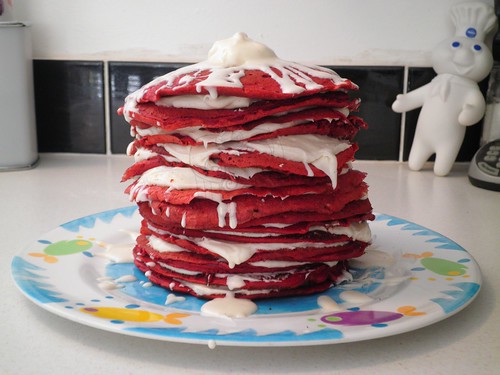
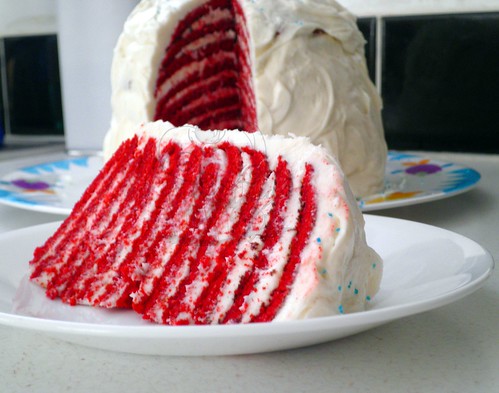
And the other reason(s)?  Because I wanted to try out a new recipe AND I needed a dessert to take to the family get-together.  Turns out K and I got more than I bargained for with the red velvet crepe cakes...they weren't terribly hard to cook up (no baking involved), but the stacking, icing, and time involved were an undertaking.  We ended up with 2 versions:

P7040598_w

The un-iced version.  Looks a lot like a stack of pancakes, albeit red ones.  I even added a pat of cream cheese "butter" and some cream cheese "syrup" to increase the illusion.


P7040605_ew

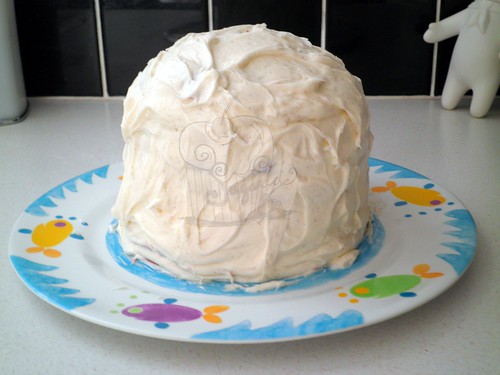
And...the iced version. Yes, I know it's crooked - icing a leaning tower of crepes is not easy!  It reminds me a tad of the Pac-Man ghosts...an albino one perhaps.  But, just wait until you see the interior of the cake!

P7040610_cew

Yep, that's 24, count 'em, 24 layers of red velvet and cream cheese frosting goodness.  Isn't it fabulous! And who would suspect that under that unassuming layer of frosting would lay this loveliness?  Guess it's true...beauty really is on the inside!

Catch you later, alligators!
P.S.  Did you figure out what everything in the post had in common?  If you guessed the color red, you are correct!  Congrats!  (The watermelon wedding cookies are a shade on the pink side, but watermelon is considered red so...)

Pomegranate Limeade Sparklers

A super easy, refreshing drink that's perfect for all your summer picnics.  It's infinitely adjustable to suit just about any taste, there is no set amount or measurements, just taste-test until you are pleased with the result!  And the fresh mint leaves add a nice unexpected flavor - don't skip or skimp on them!  If you're concerned about the leaves being in the drink you can strain it before serving, but let them steep in the liquid several hours before hand.

Pomegranate Limeade Sparklers

Printable Recipe

P7040588_cew

Ingredients:
  • Frozen limeade concentrate, thawed
  • Pomegranate juice
  • Seltzer
  • Fresh mint leaves
  • Fresh lime slices, if desired
Preparation:
  1. Pour limeade concentrate into a large pitcher.  Add at least one can (use the can the limeade comes in) of water.  Mix well.  Add the pomegranate juice and seltzer in equal amounts until desired tartness/sweetness is reached.  Add fresh mint leaves.  Refrigerate until well chilled.
  2. Serve with additional fresh mint leaves and lime slices, if desired.
Bottoms up!

05 July 2011

Freeze the Flavor


Want to keep your punch bowl drinks from becoming watered down from melting ice?  Try this handy trick:

Fill a metal bowl* halfway with water then drop in several thin slices of lime, lemon, or other complementary flavored citrus fruit.  Freeze for 4 hours or until frozen solid.  When it's frozen, add more citrus fruit slices, fill to the top with water and refreeze.  To unmold right before serving, run the bowl upside down under warm water.  (Be ready to catch the ice block as it slides free of the bowl!)  Place this citrus ice in your punch bowl to keep your drinks fresh and flavorful!

*Make sure the metal bowl you use will fit inside the punch bowl and still allow ample room for your drink.

Mmm....tasty!

02 July 2011

Chocolate Chip Cookie Pie

This is one of my absolute favorite pies!  It's fabulous served warm with a scoop of ice cream, or cold as a perfectly portable slice of cookie goodness.

I would recommend using either semi-sweet or dark chocolate chips in this recipe, or if you're feeling wild and woolly, maybe a combination of the two.  Milk chocolate would likely be much too sweet for most, including yours truly.  If you choose to omit the pecans (my preferred method) don't be afraid to throw in a couple of extra handfuls of chocolate chips.  And for goodness sake, don't try substituting margarine for the butter in this recipe!  Butter, real butter, is good and your friend when baking!

Chocolate Chip Cookie Pie
Printable Recipe
Adapted slightly from Nestle
Yield:  One 9-inch pie

P6110422_ew

Ingredients:
  • 1 unbaked 9-inch pie crust (homemade or store bought)
  • 2 large eggs
  • 1/2 cup flour
  • 1/2 cup white granulated sugar
  • 1/2 cup packed brown sugar
  • 3/4 cup (1 1/2 sticks) real butter, softened
  • 1 tsp vanilla extract
  • 1 cup chocolate chips
  • 1 cup chopped pecans, optional
  • Vanilla ice cream or sweetened whipped cream, for serving, optional
  • Chocolate sauce or caramel sauce, for serving, optional
Preparation:
  1. Preheat oven to 325°F.
  2. Beat eggs in a large mixer bowl on high speed until foamy.  Beat in flour, granulated sugar, and brown sugar.  Beat in butter and vanilla extract.  Stir in morsels and pecans, if using.  Pour into unbaked pie shell.
  3. Bake for 55 to 60 minutes or until a knife inserted halfway between the edge and center comes out clean.  Do not over bake!  Cool on a wire rack or serve slightly warmed with ice cream or whipped cream and chocolate or caramel sauce, if desired.
Happy baking!

01 July 2011

Mojito Ice Cream Pie

This pie is the perfect answer to all these hot, hot days we've been experiencing in my neck of the woods.  Granted its not a pie I would eat everyday, but it is a great fit for special occasions, particularly of the outdoor variety.  Oh, and the pie does contain alcohol, which isn't baked off, so you may want to keep this one for the "adults only."  But don't worry about those extra servings...the pie is low fat!  (Promise!)

Mojito Ice Cream Pie
Printable Recipe
Adapted from Weight Watchers
Yield: 1 9-inch pie


Ingredients:

  • 2 cups miniature pretzel twists (or sticks)
  • 2 tablespoons butter
  • 1 tablespoon sugar
  • 6 oz frozen limeade concentrate, thawed
  • 1 quart vanilla low fat frozen yogurt, slightly softened
  • 3 tablespoons rum
  • 1 tablespoon creme de menthe
  • 1 tsp grated lime zest
  • Mint leaves and lime slices, for garnish, if desired
  • Whipped cream, for garnish, if desired
Preparation:
  1. Pre-heat oven to 375°F.  Process the pretzels in a food processor until finely ground.  Add the butter, sugar, and 2 tablespoons of the limeade concentrate to the pretzels.  Process until moist and crumbly.  Press the crumb mixture evenly onto the bottom and up the sides of an ungreased 9-inch pie plate.  Bake crust until lightly toasted, about 15 minutes.  Let cool, then freeze 10 minutes or until cold.
  2. For the filling, mix the frozen yogurt, remaining limeade, rum, creme de menthe, and lime zest in a large bowl until blended.  Pour the filling into the crust.  Freeze until firm, about 4 hours.  When ready to serve, allow pie to soften slightly in the refrigerator for about 20 minutes before slicing.  Garnish with lime slices, mint leaves, and whipped cream, if desired.
Notes:
This pie freezes exceptionally well for up to 1 month.  Simply wrap the pie loosely in wax paper and then again in heavy duty foil.

Happy baking!