Advance Notice

No new orders are currently being scheduled.

27 March 2012

Bigger Isn't Always Better


Have you seen the giant bulbs of elephant garlic in your local grocery store?  If so, and you're tempted to give it a try, just keep in mind that it's not actually garlic at all.  That oversize elephant garlic is actually a member of the onion family and its flavor is much milder than regular garlic.

Mmm...tasty!


22 March 2012

Basic Brownies (A Cakey Version)

In case you haven't noticed by now...I'm a bit of a chocoholic.  And, brownies are one of my favorite standby desserts simply because they are a bit of a blank canvas.  Add a swirl of cheesecake batter...bam!  Cheesecake brownies!  Add a few ribbons of caramel...bam!  Caramel brownies!  Add a topping of marshmallow creme and graham crackers...bam!  S'mores brownies!  Add candies or chocolate chips...and bam!  Well, anywho, you get the idea...

While I like these brownies and they have a place in my recipe box, they aren't my absolute favorite.  Now, don't go thinking that they aren't still delish...it's just that I prefer mine fudgy and this recipe yields a more cake textured brownie.  But, if you want a deep, heavy cocoa flavor, these brownies won't let you down!  I suggest serving them warm with a tall glass of milk or a scoop of vanilla ice cream.

Basic Brownies (A Cakey Version)
Printable Recipe
Yield:  1 8x8 pan

P3100460_cew

Ingredients:
  • 5 oz semisweet chocolate, chopped
  • 3 oz unsweetened chocolate, chopped
  • 8 Tbsp unsalted butter, cut into small pieces
  • 3 Tbsp cocoa powder
  • 3 large eggs
  • 1 1/4 cups granulated sugar
  • 2 tsp vanilla extract
  • 1/2 tsp salt
  • 1 cup all-purpose flour

Preparation:
  1. Preheat oven, 350°F for a dark pan, 325°F for glass.  Coat your baking pan with non-stick cooking spray or line it with aluminum foil.
  2. Melt the chocolate and butter using either a double boiler or the microwave.  Once the chocolate and butter are completely melted, stir in the cocoa powder until dissolved.
  3. In a separate bowl, whisk together the eggs, sugar, vanilla, and salt until combined.  Whisk the chocolate mixture into the egg mixture.  Whisk in the flour just until combined.  Pour into your prepared baking pan and level with a spatula.
  4. Bake for 35 to 40 minutes or until a toothpick inserted in the middle comes out with a few crumbs clinging to it.  Cool for at least 1 hour.
Happy baking!

21 March 2012

All Aboard!

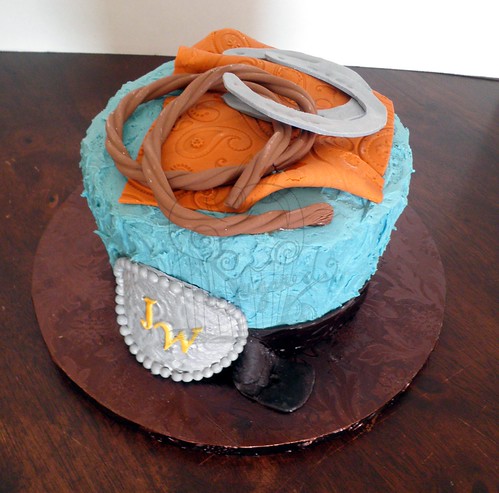
Chugga, chugga, choo choo!

Welcome to the train station, we've got several friendly engines on hand today to help deliver birthday wishes!

P3160492_cew

And, they are edible train engines to boot, so no need to try to find a place to store them after the party.  This cake was covered in buttercream with the engines, sun, name, and "2" done in gumpaste.  Oh, and the railroad tracks, too!  You can't see them very well in the photo, but they were a big hit and added a little bit of extra "oomph" to the design.

And, since I didn't have a fully booked schedule last weekend (such a rarity!), I tried my hand at making a burnt sugar cake.

Yeah...you read that correctly.  Burnt.  Sugar.  Cake.

You're wondering how I just randomly decided to make this kind of cake.  Let me walk you through it:
  1. I needed burnt sugar flavoring syrup for a completely unrelated baking project.  Nowhere in my small town would carry such a random speciality ingredient, so...to the Inter Web!
  2. I searched online for the stuff, only to decide I wasn't going to pay the outrageous prices for the product AND shipping, so I would figure out a way to make my own.
  3. I began searching for recipes...and nearly everything was tied to Burnt Sugar Cake.
  4. Let's make Burnt Sugar Syrup and try a Burnt Sugar Cake too!
See, not so hard to follow, right?  Besides, I couldn't live with the notion that I could be missing out on some fabulous, earth shattering baked good that could potentially change my life!  (This according to many reviews I read on several different, but similar recipes.  No worries, it didn't.)

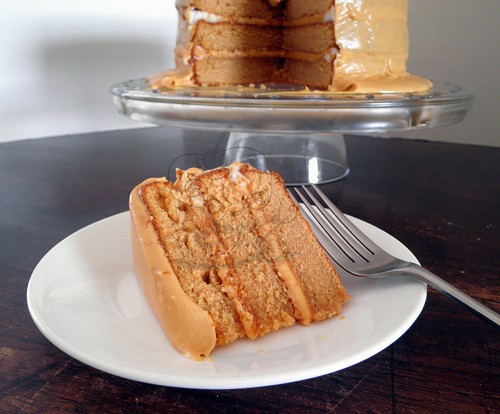
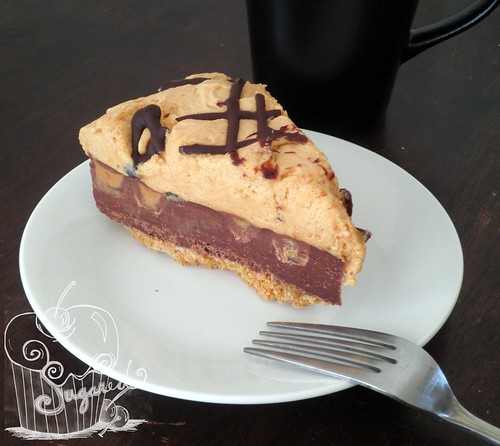
So, here's the cake:

P3170507_cew

Looks pretty good!  But...the icing was a nightmare; more like a glaze than an frosting.  (If you look closely you can see where it has slid off the cake and pooled on the cake stand. *sigh*)  And, if I were to ever make this cake again, the icing would undergo a major overhaul!  But...to be honest...I'm not sure I'll ever make this cake again.  It had a nice texture, baked up well, etc., etc., but the overall flavor was just not my cup of tea.  Maybe it's an acquired taste...

Oh, well!  Nothing ventured, nothing gained!

20 March 2012

New & Nifty: Tomato


I'm not a huge fan of the watery mess most tomatoes leave behind...it makes sandwiches soggy, salsas soupy, and forget about grilling.  Plus, I feel like I'm losing a lot of potential goodness, after all those wagon wheel slices that I can see through sometimes leave me wondering what exactly I paid for.  So, when I came across a mention of Tesoro tomatoes in one of my foodie magazines the other day, I was immediately intrigued.

Turns out this particular tomato, Tesoro, has seeds, but no gel (aka the watery guts), so they won't make your sandwiches soggy or your salsas soupy and you can grill them!  They are definitely on my "new products to try" list.  Maybe yours too, now?

Mmm...tasty!


*Not a paid advertisement!  Just wanted to share a new product that intrigued me!


16 March 2012

Lucky Leprechaun Shakes

Are you feelin' lucky?

Hopefully, you aren't feelin' green...though with the upcoming St. Patrick's Day holiday, feelin' a wee bit Irish wouldn't be a bad thing.

To help you celebrate, I whipped up these bevvies that double as dessert.  (Remember, I warned you that I like to combine desserts!)  This one contains alcohol, so it isn't suitable for the kids, but who ever said you don't deserve a treat every now and again?  Not I!

Oh, and you might notice that today's recipe has a "Printable Recipe" link; clicking it will allow you to print just the recipe, minus all the other ramblings/pictures/etc. that might be part of the original post.  Hopefully, it will make it that much handier for you to print out any recipes you want to try!  And, yes, I will be adding "printable" links to all the previous recipes I've posted, but have patience with me...it may take awhile.

Lucky Leprechaun Shakes
Printable Recipe
Yield:  2 shakes

P3110485_cew

Ingredients:

  • 4 scoops mint chocolate chip ice cream
  • 1 oz creme de menthe
  • 1/2 oz creme de cacao
  • 1 to 2 tablespoons chocolate syrup
  • Milk
  • Green food coloring, if desired
  • Chocolate sandwich cookies or green sugar, for garnish if desired

Preparation:
  1. In a blender, combine the ice cream, creme de menthe, creme de cacao, chocolate syrup, and a splash of milk.  Blend until smooth, adding more milk as needed to reach your ideal consistency.*
  2. Stir in green food coloring, if desired, then pour into a chilled glass.  Garnish with crushed chocolate sandwich cookies or green sugar; serve immediately.
*You can add additional creme de menthe or creme de cacao in place of the milk to thin the shake, if preferred.  If the shake becomes too thin, add additional ice cream.

If you are in need of a toast to give when you serve these drinks, may I offer one of my favorite Irish blessings:

May the road rise up to meet you,
May the wind be ever at your back.
May the sun shine warm upon your face,
And the rain fall softly on your fields.
And until we meet again,
May God hold you in the palm of his hand.

Course, if that one is too long winded or serious for you, then perhaps just a simple "Sláinte" will serve you well.

Sláinte! 

14 March 2012

Candied Cuppies

Translation:  "cuppies" = cupcakes, standard size.  Or at least it does here in my world.  I'm sure there are others who refer to cupcakes in the same way...

But, anywho, now that you are familiar with the local jargon, how about a few citrus cuppies?

P3090450_ew

The key lime version is on the left, the lemon version is on the right.  (Just in case the citrus peel toppers didn't give it away. Hehe!)  This is the first time I've candied citrus peel, and let me just say, it's a time consuming process...but the results are sooo delish!  I had to force myself to stop sampling the finished product; otherwise, there wouldn't have been enough to top the cupcakes.

If citrus isn't your choice, then maybe a few butterflies and blossoms?

P3110467_cew

They have a very "spring" vibe, don't they?  And, I admit, these cuppies added to my intensifying case of spring fever.  We've been having gorgeous weather here, and all I want to do is spend hours and hours outside - plotting a garden, reading on the back deck, etc.  Oh, and in case you are wondering, I didn't make the candies, I picked them up at our local superstore in the Easter candy section...

Or, maybe you're still searching for the pot of gold at the end of the rainbow?  If so, these might interest you.

P3020426_cew

Yup, chocolate cupcakes with buttercream icing AND a rainbow sugar cookie topper.  I'm a firm believer in combining two desserts into one...makes life that much sweeter and it means you don't have to decide between one or the other!

Speaking of pots of gold, don't forget that Saint Patrick's Day is this Saturday, March 17; make sure you remember to wear your green!  Oh, and be sure to check back on Friday for a "lucky" dessert/drink recipe!

Slán!

13 March 2012

Clean Cut


If you took a gander at this delicious recipe the other day, then you have a hint about today's Tasty Tip - how to cleanly slice cheesecakes, pies, cakes, etc.

The best way, and the one that will work for just about any kind of cake/pie/etc, even one with nuts, fruit, or candies in it, is to use a hot knife.  How to do this:
  • Fill a tall container (a water pitcher or tall vase works well) with enough hot tap water to cover the entire blade of the knife.
  • Dip the knife into the hot water, then wipe it dry with a clean towel before making a cut.  Repeat the process for each slice.
Alternatively, you can use a piece of cheese wire, fishing line, or unflavored dental floss (all new and unused, of course!) to slice your dessert as long as it doesn't contain any nuts, fruit, or other large bits.  Simply cut a piece of floss/line/wire that is long enough to stretch across the cake and wrap around your first finger on both hands.  Pull the floss taut across the cake, then press it down through the cake using your thumbs.  Once you've gone through the cake completely, release one side of the floss, pull it through the cake, and repeat until you have the entire cake sliced.
Another tip for getting the cleanest cut slices you possibly can - always pull the knife out from the side of the cake, rather than lifting it through the top.

Mmm...tasty!

10 March 2012

Bow Ties & Buckles

And a few other things too.

But, first!

Bow Ties for a new baby boy.  Sugar cookies, of course.

P3020382_cew

A buckle for a western-themed birthday.  And a few other cowboy necessities...

P3020386_cew

A blast from my past.  (This cake made me want to play not only Mario Brothers, but also Duck Hunt on the old NES system.  Showing my age, I know!)

P3020403_cew

And, snap, crackle, pop!  A krispy cake for A.
  
P3040428_cew

You may be thinking this is an oddly designed cake, never minding the fact that there is no actual cake or icing to it.  If so, you're right, this isn't how I originally planned to stack this cake, but I dropped the tray that Donald was on, so his severed legs necessitated a different design.  At least it was a clean break and I could piece him back together again!

Good thing I'm adaptable sometimes, huh?

08 March 2012

Reese's Fudge Pie

Graham crackers...chocolate fudge...peanut butter cup candies...peanut butter mousse...and just a light drizzle of chocolate to finish.

Are you drooling yet?

This pie is amazingly good and amazingly rich.  That's really all I think I need to say about it; no sense in wasting words when you could be putting this decadence together!

But, wait, there is just one little thing...  I can't help myself, and you'll thank me later.  Promise!

The thick fudge layer can turn slicing this pie into an adventure.  But to easily solve the problem, allow the pie to warm at room temperature for about 30 minutes before slicing AND run your knife under hot water for a few seconds before cutting each piece.  Though if you'd rather not mess with the hot knife tip, you can just hack your way through the pie with a cold knife - you'll get an arm and wrist workout that way!

Ready to make your own?

Reese's Fudge Pie
Printable Recipe
Yield:  12 servings
P3040440_cew


Ingredients:

  • For the crust:
    • 1 1/2 cups graham cracker crumbs
    • 6 Tbsp butter, melted
    • 1/3 cup white granulated sugar
  • For the fudge:
    • 14 oz sweetened condensed milk
    • 2 cups milk chocolate chips
    • 1 cup semi-sweet chocolate chips
    • 1/4 tsp salt
    • 8 oz bag Reese's minis OR 1 cup roughly chopped Reese's Peanut Butter Cups
  • For the Peanut Butter Mousse:
    • 1 cup creamy peanut butter
    • 1 cup powdered sugar
    • 8 oz cream cheese, softened
    • 8 oz Cool Whip, thawed
    • 1/4 cup melted chocolate, for drizzling

Preparation:
  1. Make the crust:
    1. Preheat oven to 350°F.
    2. Mix the graham cracker crumbs, butter, and sugar in a small bowl.  Press the mixture into a 9-inch springform pan.  
    3. Bake at 350°F for 8 to 9 minutes.  Set aside to cool.
  2. Make the fudge:
    1. Place the sweetened condensed milk, the chocolate chips, salt, and vanilla extract in a saucepan.
    2. Heat over medium-low, stirring constantly, until melted and smooth.  Be careful not to burn the mixture.
    3. Spread the fudge over the crust.  Sprinkle the Reese's over the top of the fudge and use your clean hand or a spatula to press the pieces lightly into the fudge.
  3. Make the mousse:
    1. Mix the peanut butter, powdered sugar, and cream cheese with a hand mixer until creamy, about 5 minutes.
    2. Fold in the Cool Whip.
    3. Spread the mousse over the fudge layer.  Drizzle with the melted chocolate, if desired.  Refrigerate at least 1 hour or until 30 minutes prior to serving.
Happy baking!

06 March 2012

Ingredient Substitution: Buttermilk


You've found the perfect recipe for fluffy pancakes; the only problem is that the recipe calls for buttermilk and you just can't bring yourself to buy a half gallon of the stuff, knowing full well that you'll only use it this one time before it expires and you have to throw it out.  The solution?  Well, I've got two possibilities for you!
  1. Buy a can of powdered buttermilk.  (I use the Saco brand.)  It keeps for a long while, is cost effective, and will work perfectly well in most recipes.
  2. Use pantry/fridge ingredients.  Add 1 tablespoon of fresh lemon juice or white vinegar to a liquid measuring cup, then add enough milk to measure 1 cup.  Let the mixture sit until it curdles, about 5 to 10 minutes.
Mmm...tasty!


02 March 2012

Seems Familiar...

P2240363_cew

Doesn't it?  Somewhat comparable to this cake and this cake, right?  If so, then that's a good thing, since the design was based off of the second cake in particular.  Everything was edible except for the feather accessory and the purse handle - I had to put wire through the fondant handle in order to give it enough support to stand.  The purse was formed from rice krispies and the gumpaste makeup pieces were personalized with the birthday girl's initials/monogram.

P2240352_ew

This cake, although you can't tell it here, was Neapolitan.  Confused?  The layers were white almond cake, chocolate cake, and strawberry cake.  Makes sense now, right?  Oh, and on a side note, I am not a fan of Neapolitan ice cream.  Not that you probably needed or cared to know that, but now you do!

I was a bit apprehensive about how this cake was going to turn out considering the color scheme and all the patterns (the design was the recipient's with minimal input from yours truly), but I actually really liked the cake once it was completely finished.  The bow at the base is probably one of my favorites I've made to date; it has a perfect shape and was SUPER easy to build.  I'm going to have to try the pattern for a larger size bow just to see if it's still as easy and as prettily shaped.

And, on a completely non-cake related note, we are gearing up for kidding season around the homeplace, so I've been picking out lots of new recipes to cook for the fam and crew.  If any of them are particularly delish, I'll do my best to share the recipes and photos.  The recipes will be the easy part...trying to snap photos of a dish before the hungry masses descend on it is another thing entirely, so wish me luck!

Talk to you soon!