
Aside from worrying about whether the writing is pretty or not, there's also the worry about correct spacing, making sure the words don't run downhill, not misspelling anything (I live in fear of doing this, I don't want to end up on CakeWrecks because of a misspelling)...needless to say, sometimes it takes me longer to get lettering/wording on cake than it does to decorate the rest of it. It's an exhausting process.
But, one of my methods to help prevent mess-ups and to circumvent the whole "less than pretty" handwriting problem is to use candy melt inscription transfers. Or in other words, to write on the cake using candy melts. Although, technically, I don't write directly on the cake...anywho, here's how it works:
How-To: Candy Melt Inscription Transfers
What You'll Need:
Sheet Pan (or some other smooth, flat surface that is portable,
will hold your design, and will conduct cold well)
Wax Paper
Scotch Tape
Template of the design
Candy melts/wafers in your desired color
Piping bag
Piping tip
Offset Spatula
Iced/decorated cake
What You'll Need:
Sheet Pan (or some other smooth, flat surface that is portable,
will hold your design, and will conduct cold well)
Wax Paper
Scotch Tape
Template of the design
Candy melts/wafers in your desired color
Piping bag
Piping tip
Offset Spatula
Iced/decorated cake

What To Do:
2. Cover the template with wax paper; be sure to tape the wax paper down so it doesn't move around. Put the sheet pan (template, wax paper, and all) into the freezer while you melt the candy wafers according to the package directions until smooth. Place the piping tip in the piping bag, then fill with the melted candy wafers.
3. Remove the sheet pan from the freezer. Begin piping over your design template.
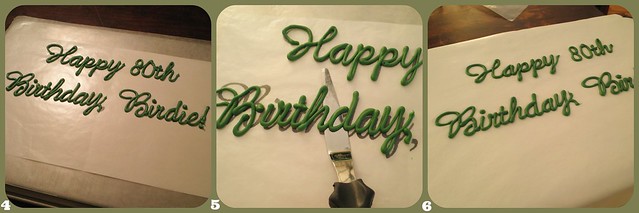
5. When you are ready to transfer the design to your cake, place the sheet pan with the design still on it, back into the freezer. Allow to harden, usually about 10 minutes or so. Once the design is frozen, remove the sheet pan from the freezer and immediately, but gently, use an offset spatula to loosen the candy melt design from the wax paper. Work quickly, but carefully; you want the pieces to still be semi-frozen when you place them on the cake.
6. Once the pieces are loosened from the wax paper, place immediately onto the cake. Finish decorating, as needed.
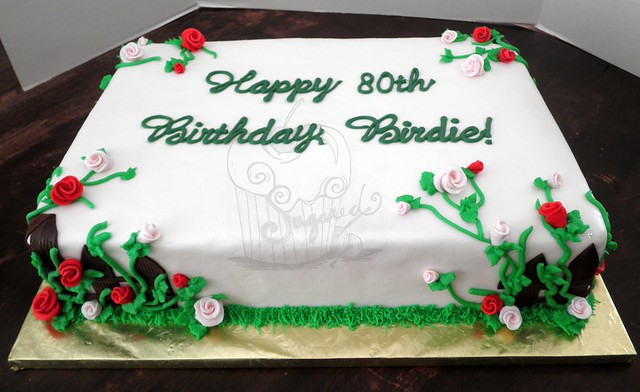 |
| Finished cake with candy melt writing transfer. |
See, easy peasy. Nearly any type of writing can be mimicked using this method, and these types of candy melt decorations can be made days in advance or minutes before use. They really are fairly quick to create once you have all the needed supplies. You can also use this method to pipe fairly simple design elements (hearts, swirls, monograms, etc) to be used as decorations for cakes, mini cakes, and cupcakes.
You're probably thinking, "why all the freezer time?" Well, I've discovered that initially freezing the sheet pan makes the candy melts set-up faster, meaning they will hold their shape better rather than flattening out and possibly running together. Freezing again immediately after piping the design also means that the melts will set-up more quickly, again minimizing the chance of flattening/running. The final freezer visit ensures that the melts are well set-up and cold enough that the heat from your hands won't cause the design to melt while you are applying it to the cake.
Happy caking!

P.S. You can click on the tutorial photos to see larger versions of them.
Happy caking!
P.S. You can click on the tutorial photos to see larger versions of them.
Hey, what font and size did you use for your template?
ReplyDeleteI honestly can't remember what I used on the cake in the tutorial. I usually try to select a font and size that match the theme or "feel" of the cake.
DeleteHi! Will the wordings hold in room temperature once i hv placed them on the cake?
ReplyDeleteYes, they will be fine at room temperature. If they get too warm though, they will melt!
Delete